If you are considering which application you should use, TiviMate is an ideal choice that you cannot pass. Tivimate is compatible with many devices such as Android, IOS, Firestick, and PC. In this post, I will guide you how to install and use Tivimate app.
Step 1 Download app
With Android, you can download the TiviMate app from Google Play If you using IOS, you can install the app from App store With Firestick, the app can downloaded from Downloader If you want to use TiviMate, you need to pay for it, but you will have 5 days to use for free.
In 2025, the way we consume television has evolved dramatically, with IPTV (Internet Protocol Television) apps leading the charge. These apps allow you to stream live TV, movies, and on-demand content directly to your smartphone, offering a flexible and cost-effective alternative to traditional cable or satellite TV. Whether you’re an Android or iOS user, the right IPTV app can transform your smartphone into a portable entertainment hub. In this SEO-optimized article, we’ll explore the best IPTV apps for smartphones in 2025, highlighting their features, compatibility, and why they stand out in today’s crowded market.
What is IPTV and Why Use It on Your Smartphone?
IPTV delivers television content over the internet, bypassing traditional broadcast methods. With a stable internet connection, you can access thousands of live channels, movies, and shows anytime, anywhere. Smartphones, with their portability and advanced hardware, are ideal devices for IPTV streaming in 2025. From 4K streaming capabilities to user-friendly interfaces, IPTV apps make it easy to enjoy high-quality entertainment on the go.
Here’s why IPTV apps are a game-changer for smartphone users:
Affordability: Cheaper than cable subscriptions.
Flexibility: Watch live TV or on-demand content wherever you are.
Variety: Access global channels, sports, movies, and more.
Now, let’s dive into the top IPTV apps for smartphones in 2025.
Best for: Android users seeking a premium IPTV experience Compatibility: Android smartphones, Android TV Key Features:
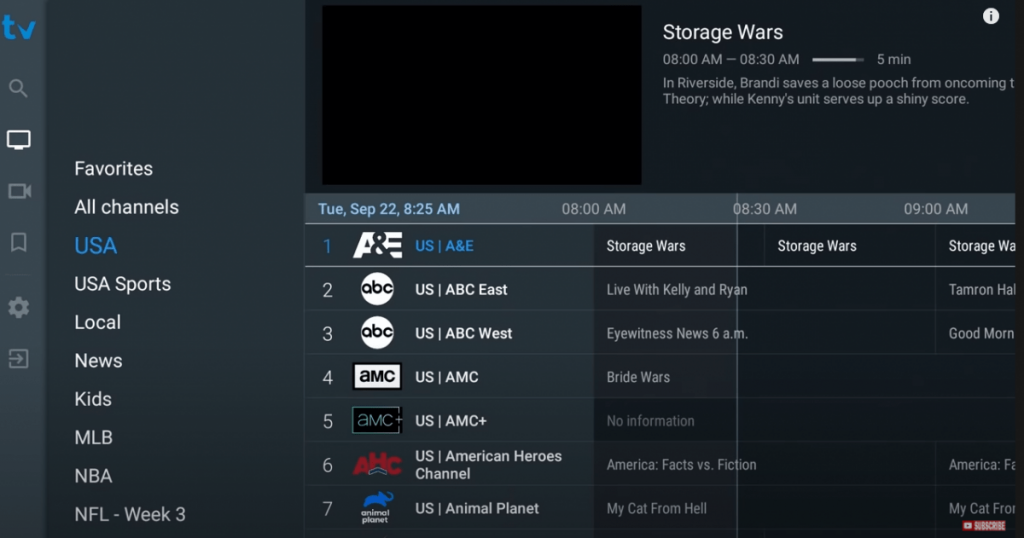
Sleek, modern interface designed for large and small screens.
Multi-playlist support and EPG (Electronic Program Guide) integration.
Customizable channel layouts and parental controls.
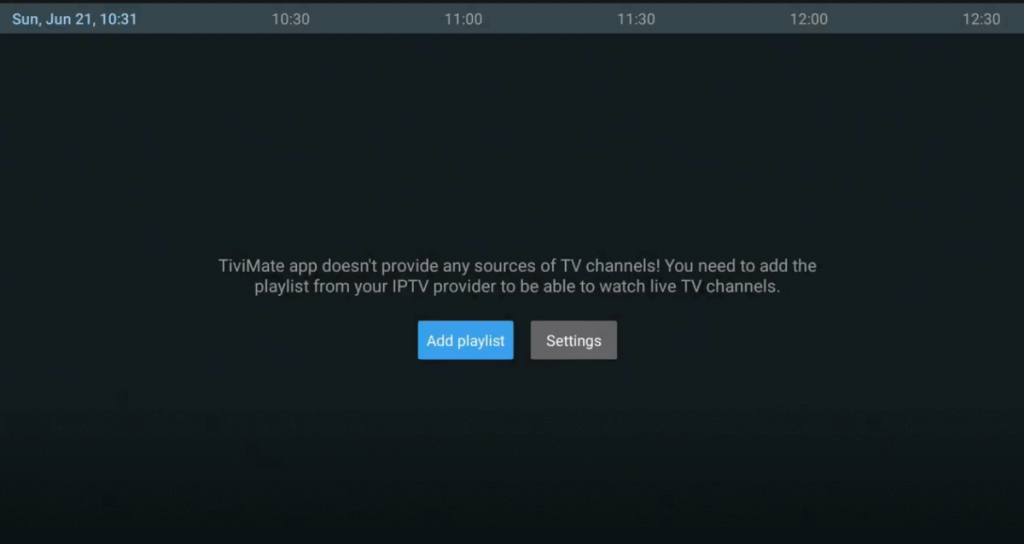
TiviMate remains a favorite in 2025 for its robust features and smooth performance on Android smartphones. While it doesn’t come with built-in channels, it pairs seamlessly with IPTV subscriptions, offering a tailored viewing experience. The premium version unlocks advanced options like multi-device support, making it worth the small investment.
Why It’s Great: Its intuitive design and reliability make it a top choice for Android users.
2. IPTV Smarters Pro
Best for: Cross-platform streaming Compatibility: Android, iOS Key Features:
Supports live TV, movies, and series with an integrated player.
Multi-screen viewing and external player support (e.g., VLC).
IPTV Smarters Pro is a versatile app that works flawlessly on both Android and iOS smartphones. Its clean interface and support for M3U playlists or Xtream-Codes API make it a go-to for users with IPTV subscriptions. In 2025, its regular updates ensure compatibility with the latest devices and streaming protocols.
Why It’s Great: Cross-platform support and a feature-rich experience make it a standout.
3. XCIPTV Player
Best for: Stylish interface and ease of use Compatibility: Android, iOS Key Features:
Built-in media players with adaptive HLS streaming.
Favorites function and maintenance notifications.
Highly customizable UI with a professional look.
XCIPTV Player shines in 2025 with its visually appealing design and smooth navigation. It’s perfect for smartphone users who want a premium feel without complicated setup. The app’s built-in players eliminate the need for third-party software, making it a hassle-free option.
Why It’s Great: A sleek design paired with powerful streaming capabilities.
4. Perfect Player IPTV
Best for: Customization and compatibility Compatibility: Android Key Features:
Perfect Player IPTV is a lightweight yet powerful app for Android smartphones. It’s ideal for users who want full control over their IPTV experience, from playlist management to decoder settings. In 2025, its compatibility with a wide range of devices keeps it relevant.
Why It’s Great: Offers a balance of simplicity and advanced customization.
5. GSE Smart IPTV
Best for: Multi-format playlist support Compatibility: Android, iOS Key Features:
Dynamic language switching and playlist management.
Chromecast and AirPlay compatibility.
GSE Smart IPTV is a reliable choice for smartphone users in 2025, thanks to its versatility and cross-platform support. It’s particularly popular for its ability to handle various playlist formats, making it easy to integrate with different IPTV providers.
Why It’s Great: Flexible and user-friendly for both Android and iOS users.
6. Kodi
Best for: Open-source enthusiasts Compatibility: Android, iOS Key Features:
Fully customizable with add-ons for IPTV streaming.
Supports 4K and HD playback with the right plugins.
Cross-platform syncing for a unified experience.
Kodi isn’t a traditional IPTV app but earns its spot in 2025 as a powerful media player. With the right add-ons, it transforms your smartphone into an IPTV streaming powerhouse. It requires some setup, but the payoff is unmatched flexibility.
Why It’s Great: Open-source freedom and extensive customization options.
7. IPTV Extreme
Best for: Feature-packed free option Compatibility: Android Key Features:
IPTV Extreme offers a robust free version for Android users in 2025, with a one-time Pro upgrade to remove ads. Its extensive feature set, including remote control support, makes it a strong contender for smartphone streaming.
Why It’s Great: Affordable and packed with useful features.
8. Televizo
Best for: Minimalist design Compatibility: Android Key Features:
Simple, streamlined interface.
Playlist management and content filtering.
High-quality playback with minimal buffering.
Televizo is perfect for Android users who prefer a no-frills IPTV app. Its minimalist design doesn’t compromise on performance, delivering smooth streaming and easy playlist integration in 2025.
Why It’s Great: Clean, efficient, and easy to use.
9. Ottplayer
Best for: Playlist syncing across devices Compatibility: Android, iOS Key Features:
Syncs playlists via the Ottplayer website.
Ad-free experience with customizable channel icons.
Supports M3U playlists and multiple streaming protocols.
Ottplayer stands out in 2025 for its cloud-based playlist management, allowing seamless access across your smartphone and other devices. It’s a solid pick for users who value convenience and a clutter-free experience.
Why It’s Great: Effortless syncing and an ad-free interface.
10. Dino IPTV
Best for: High-definition streaming Compatibility: Android, iOS Key Features:
4K content support for compatible devices.
Intuitive UI with customizable playlists.
Chromecast and smart TV integration.
Dino IPTV rounds out our list with its focus on high-quality streaming and a user-friendly design. In 2025, it’s a top choice for smartphone users seeking crystal-clear playback and global channel access.
Why It’s Great: Superior streaming quality and ease of use.
How to Choose the Best IPTV App for Your Smartphone
With so many options, selecting the right IPTV app for your smartphone in 2025 depends on your needs. Here are key factors to consider:
Compatibility: Ensure the app works with your Android or iOS device.
Features: Look for EPG support, playlist flexibility, and casting options.
Cost: Free apps may have ads; premium versions often offer better features.
Streaming Quality: Prioritize apps that support HD or 4K playback.
User Interface: A clean, navigable design enhances your experience.
For most users, a combination of reliability, ease of use, and compatibility will determine the best fit.
Tips for Using IPTV Apps on Your Smartphone
Stable Internet Connection: Aim for at least 15 Mbps to avoid buffering.
VPN Usage: Protect your privacy and access geo-restricted content.
Subscription Pairing: Most IPTV apps require an external provider or playlist.
Regular Updates: Keep your app updated for optimal performance in 2025.
Conclusion: The Future of IPTV on Smartphones in 2025
As IPTV continues to grow in popularity, 2025 brings a wealth of excellent apps for smartphone users. Whether you prioritize a sleek interface (XCIPTV Player), cross-platform support (IPTV Smarters Pro), or customization (Kodi), there’s an app to suit every preference. Pair these apps with a reliable IPTV subscription, and your smartphone becomes a gateway to endless entertainment.
FAQ
1. What is the best IPTV app for smartphones in 2025?
TiviMate tops the list for Android users, while IPTV Smarters Pro is great for both Android and iOS.
2. Are IPTV apps free to use on smartphones?
Many, like IPTV Extreme, offer free versions with ads; premium upgrades unlock extra features.
3. Do IPTV apps work on both Android and iOS?
Yes, apps like IPTV Smarters Pro, XCIPTV Player, and GSE Smart IPTV support both platforms.
4. Can I watch 4K content with IPTV apps in 2025?
Yes, apps like Dino IPTV and Kodi (with add-ons) support 4K streaming on compatible devices.
5. Do I need a subscription for IPTV apps?
Most apps require an IPTV provider subscription or M3U playlist to access content.
Let me know if you need more!
Ready to cut the cord? Download one of these top IPTV apps for your smartphone today and experience the future of television in 2025!
How to Install IPTVnator on Windows: A Step-by-Step Guide
If you’re looking for an easy way to stream IPTV content on your Windows PC, IPTVnator is a fantastic choice. This open-source IPTV player is lightweight, user-friendly, and supports a variety of playlist formats like M3U. In this guide, we’ll walk you through how to install IPTVnator on Windows step-by-step, ensuring you can start watching your favorite channels in no time.
Whether you’re a beginner or a tech-savvy user, this tutorial will make the installation process simple and hassle-free. Let’s dive in!
What is IPTVnator?
Before we get into the installation steps, let’s briefly cover what IPTVnator is. IPTVnator is a free, cross-platform IPTV application built using Electron. It allows users to load IPTV playlists (typically in M3U format) and stream live TV channels, movies, and shows directly on their devices. Its compatibility with Windows, macOS, and Linux makes it a versatile option for IPTV enthusiasts.
Prerequisites for Installing IPTVnator on Windows
To ensure a smooth installation, make sure you have the following:
A Windows PC (Windows 10 or 11 recommended).
A stable internet connection.
An IPTV playlist (M3U URL or file) to use with IPTVnator after installation.
Now, let’s move on to the installation process.
Top Recommendation: Discover the ultimate entertainment solution with 7 Days Great IPTV Subscription, designed just for you.
Step-by-Step Guide: How to Install IPTVnator on Windows
Follow these simple steps to get IPTVnator up and running on your Windows computer.
Step 1: Download the IPTVnator Installer
Open your preferred web browser (e.g., Chrome, Firefox, or Edge).
Visit the official IPTVnator GitHub page or search for “IPTVnator download” to find a trusted source.
On the GitHub releases page (github.com/4gray/iptvnator/releases), locate the latest version of IPTVnator.
Scroll down to the “Assets” section and download the Windows executable file (e.g., IPTVnator.Setup.exe).
Pro Tip: Always download from the official source to avoid malware or outdated versions.
Step 2: Run the Installer
Once the download is complete, navigate to your Downloads folder (or wherever you saved the file).
Double-click the IPTVnator.Setup.exe file to launch the installer.
If prompted by Windows User Account Control (UAC), click Yes to allow the app to make changes to your device.
Step 3: Follow the Installation Wizard
The IPTVnator setup wizard will appear on your screen.
Choose your preferred installation location (the default is usually fine for most users).
Click Next and then Install to begin the installation process.
Wait for the installation to complete—it typically takes just a few seconds.
Once finished, check the box to Launch IPTVnator and click Finish.
Step 4: Launch IPTVnator and Add Your Playlist
After installation, IPTVnator will open automatically (if you selected the launch option).
To start streaming, you’ll need to add an IPTV playlist:
Click the + button or go to the “Add Playlist” option.
Choose to either upload an M3U file from your computer or paste an M3U URL provided by your IPTV service provider.
Click Save or Load, and your channels should populate within the app.
Step 5: Enjoy Streaming IPTV on Windows
That’s it! You’ve successfully installed IPTVnator on your Windows PC. Browse through your playlist, select a channel, and start streaming your favorite content.
Troubleshooting Common Installation Issues
If you run into problems while installing IPTVnator, here are some quick fixes:
Installer Won’t Run: Ensure you have administrative privileges on your PC. Right-click the installer and select “Run as Administrator.”
Download Fails: Check your internet connection or try downloading from a different browser.
App Crashes: Update your Windows OS and ensure your system meets the minimum requirements for Electron-based apps.
Why Choose IPTVnator for Windows?
IPTVnator stands out for several reasons:
Free and Open-Source: No hidden fees or subscriptions.
Lightweight: Doesn’t slow down your PC.
Customizable: Supports multiple playlists and EPG (Electronic Program Guide) integration.
Compared to alternatives like VLC Media Player or Kodi, IPTVnator offers a simpler interface tailored specifically for IPTV streaming.
Conclusion
Installing IPTVnator on Windows is a straightforward process that takes just a few minutes. By following this guide, you can quickly set up this powerful IPTV player and start enjoying live TV on your PC. Whether you’re using an M3U file or a URL from your IPTV provider, IPTVnator makes streaming seamless and enjoyable.
FAQ
1. What is IPTVnator, and is it free?
IPTVnator is a free, open-source IPTV player for streaming live TV on Windows and other platforms.
2. Where can I download IPTVnator for Windows?
Download it from the official GitHub page (github.com/4gray/iptvnator/releases) under the latest release.
3. Do I need an IPTV subscription to use IPTVnator?
Yes, you need an M3U playlist or URL from an IPTV provider to stream content.
4. Can I install IPTVnator on Windows 11?
Yes, IPTVnator works on Windows 10, 11, and earlier versions.
5. What should I do if IPTVnator won’t install?
Run the installer as an administrator or check your internet connection and system compatibility.
Ready to get started? Download IPTVnator today and elevate your IPTV experience on Windows!
If you’re looking for a free, easy-to-use streaming service packed with live TV channels, movies, and on-demand content, Pluto TV is an excellent choice. Even better, it’s fully compatible with Amazon FireStick, allowing you to enjoy its offerings on your big screen. In this guide, we’ll walk you through how to install Pluto TV on FireStick quickly and easily, so you can start streaming in no time.
Whether you’re a cord-cutter or just exploring new entertainment options, Pluto TV’s 250+ channels and simple interface make it a must-have app. Let’s dive into the step-by-step process!
Why Choose Pluto TV for FireStick?
Before we get into the installation steps, let’s explore why Pluto TV is worth adding to your FireStick. Pluto TV is a free, ad-supported streaming platform that offers a mix of live TV channels and on-demand content. From news and sports to movies and kids’ shows, there’s something for everyone. Plus, it’s legal, user-friendly, and doesn’t require a subscription—perfect for budget-conscious streamers.
Top Recommendation: Discover the ultimate entertainment solution with 7 Days Great IPTV Subscription, designed just for you.
Now, let’s get Pluto TV up and running on your FireStick!
Prerequisites for Installing Pluto TV on FireStick
To ensure a smooth installation, make sure you have the following:
Amazon FireStick: Any model (FireStick Lite, 4K, or Cube) will work.
Stable Internet Connection: A reliable Wi-Fi connection is essential for streaming.
FireStick Remote: You’ll need it to navigate the interface.
That’s it! No special tools or tech skills are required.
Step-by-Step Guide: How to Install Pluto TV on FireStick
Pluto TV is available directly through the Amazon Appstore, so you won’t need to sideload it or mess with complicated settings. Follow these simple steps to install it:
Step 1: Power Up Your FireStick
Plug your FireStick into your TV’s HDMI port and connect it to power.
Ensure it’s connected to your Wi-Fi network.
Step 2: Navigate to the Search Menu
From the FireStick home screen, go to the magnifying glass icon in the top-left corner.
This opens the Search function.
Step 3: Search for Pluto TV
Using the on-screen keyboard, type “Pluto TV.”
As you type, suggestions will appear—select “Pluto TV” when you see it.
Step 4: Select and Download Pluto TV
Once Pluto TV appears in the search results, click on it.
On the app page, press the “Download” or “Get” button (the label depends on your FireStick version).
The app will begin downloading and installing automatically.
Step 5: Open Pluto TV
After the installation completes, you’ll see an “Open” button—click it to launch the app.
Alternatively, return to your FireStick home screen, go to “Your Apps & Channels,” and find Pluto TV there.
Step 6: Start Streaming!
When you open Pluto TV, you’ll be greeted with a guide of live channels and on-demand options.
No account is required—just browse and watch whatever catches your eye!
Troubleshooting: What If Pluto TV Won’t Install?
While the process is usually seamless, here are some quick fixes for common issues:
Slow Download: Check your internet connection. Restart your router if needed.
App Not Showing: Ensure your FireStick is updated to the latest software (Settings > My Fire TV > About > Check for Updates).
Storage Full: Go to Settings > Applications > Manage Installed Applications and uninstall unused apps to free up space.
If problems persist, restart your FireStick by unplugging it for 10 seconds and try again.
How to Use Pluto TV on FireStick
Once installed, Pluto TV is incredibly easy to navigate. Here’s a quick rundown:
Live TV: Scroll through the channel guide to watch news, sports, or entertainment in real time.
On-Demand: Explore movies and shows available anytime.
Categories: Use the menu to filter content by genre, like comedy, drama, or kids.
There’s no login required, though creating a free Pluto TV account lets you save favorites and customize your experience.
Is Pluto TV Legal and Safe on FireStick?
Yes, Pluto TV is 100% legal and safe to use. It’s owned by Paramount and operates as an ad-supported service, meaning you get free content in exchange for occasional commercials. Downloading it from the official Amazon Appstore ensures you’re getting the legitimate version.
Benefits of Pluto TV on FireStick
Here’s why FireStick users love Pluto TV:
Free Access: No subscription fees—just download and watch.
Wide Variety: Over 250 channels, plus thousands of movies and shows.
FireStick Compatibility: Works flawlessly on all FireStick devices.
Final Thoughts: Enjoy Pluto TV on FireStick Today
Installing Pluto TV on your FireStick is a quick, beginner-friendly process that opens up a world of free entertainment. With just a few clicks, you’ll have access to live TV and on-demand content without spending a dime. Follow the steps above, and you’ll be streaming in minutes!
FAQ
Can I install Pluto TV on any FireStick model? Yes, Pluto TV works on all FireStick models, including FireStick Lite, FireStick 4K, and Fire TV Cube.
Do I need an account to use Pluto TV on FireStick? No, you can start watching without an account, but signing up for a free account lets you save favorites.
Is Pluto TV really free on FireStick? Yes, Pluto TV is completely free—it’s ad-supported, so you’ll see commercials during streaming.
What should I do if Pluto TV won’t download on my FireStick? Check your internet connection, ensure your FireStick has enough storage, and restart the device if needed.
How many channels does Pluto TV offer on FireStick? Pluto TV provides over 250 live channels, plus thousands of on-demand movies and shows.
Have questions about Pluto TV or FireStick setup? Drop them in the comments below, and happy streaming!