Month: August 2023

VLC Media Player is a versatile and widely used application that supports a variety of multimedia formats. One of its lesser-known but incredibly useful features is the ability to change the audio channel. Whether you’re watching a movie with multiple audio tracks or trying to adjust the audio balance, VLC makes it convenient to tailor your audio experience. How to watch IPTV on VLC?

Introduction

VLC Media Player is renowned for its user-friendly interface and extensive features. However, the ability to change audio channels might not be immediately obvious to users. This guide aims to simplify the process and help you make the most of VLC’s audio customization options. How to optimize my VLC player for watching IPTV?

Understanding VLC’s Audio Options

VLC provides various audio-related features that empower users to personalize their audio playback. From adjusting the balance between left and right channels to switching between different audio tracks, these options give you full control over your listening experience.

Selecting a Different Audio Channel

  1. Step 1: Open VLC Media Player on your device.
  2. Step 2: Play the video or audio file you want to adjust.
  3. Step 3: Right-click on the playback screen to open the context menu.
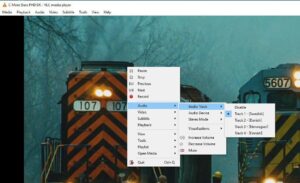
  4. Step 4: Navigate to the “Audio” or “Audio Track” option. Here, you’ll find a list of available audio channels.

Adjusting Audio Balance

Sometimes, the audio balance between the left and right channels might not be optimal. VLC allows you to fine-tune this balance according to your preferences.

  1. Step 1: Follow the same steps as above to access the context menu.
  2. Step 2: Choose the “Audio Effects” or “Effects and Filters” option.
  3. Step 3: In the “Audio Effects” tab, navigate to the “Spatializer” or “Channel Mixer” section.
  4. Step 4: Adjust the sliders to achieve the desired audio balance.

Switching Between Audio Tracks

Some videos or movies contain multiple audio tracks, such as different languages or commentary. VLC lets you easily switch between these tracks.

  1. Step 1: While the video is playing, right-click to open the context menu.
  2. Step 2: Go to the “Audio” or “Audio Track” option.
  3. Step 3: Select the desired audio track from the list.

Audio Preferences and Settings

VLC’s audio customization goes beyond the basics. By exploring the preferences and settings, you can further enhance your audio experience.

  1. Step 1: Click on the “Tools” menu at the top of the VLC window.
  2. Step 2: Choose “Preferences” or “Settings.”
  3. Step 3: Navigate to the “Audio” or “Audio Settings” section.
  4. Step 4: Explore options like equalization, compressor, and more.

Enhancing Your Audio Experience

To take your audio quality up a notch, consider these additional tips:

  • Use Headphones: For a more immersive experience, opt for high-quality headphones.
  • Apply Audio Effects: Experiment with VLC’s built-in audio effects to enhance bass, clarity, and more.
  • Utilize Equalization: Adjust the equalizer settings to match your audio preferences.

Troubleshooting Common Issues

Encountering audio problems? Here are some quick fixes:

  • No Sound: Check your device’s audio settings and ensure VLC’s volume is up.
  • Audio Sync Issues: Use VLC’s sync adjustment feature to match audio with video.

Frequently Asked Questions (FAQs)

  1. Q: Can I change the audio channel of any media file?
    • A: Yes, as long as the media file has multiple audio channels or tracks.
  2. Q: Are the audio effects permanent?
    • A: No, the effects are applied in real time and can be adjusted or turned off.
  3. Q: Can I save my custom audio settings?
    • A: Yes, you can save your preferences by creating audio profiles in VLC’s settings.
  4. Q: Does VLC support surround sound?
    • A: Yes, VLC is capable of decoding and playing surround sound audio formats.
  5. Q: Can I change the audio channel on mobile devices?
    • A: Yes, VLC’s mobile app offers similar audio customization options.

Conclusion

VLC Media Player’s ability to change audio channels provides users with a remarkable level of control over their multimedia experience. By following the steps outlined in this guide, you can seamlessly switch between audio tracks, adjust the balance, and optimize audio settings to match your preferences. Whether you’re a movie enthusiast or a music lover, VLC’s audio customization features are designed to enhance your enjoyment.


Great Premium IPTV Subscription

Great IPTV is the best IPTV provider with more than 10,000 channels and more than 40,000 VOD on a private server using a +10Gbps Network, Great IPTV at Great Premium IPTV is looking forward to Helping All IPTV Users to enjoy their IPTV Subscription, Great IPTV the best Premium IPTV Subscription Which you can BUY Great IPTV Subscription From Here.

How to Set Date and Time on MAG Device: A Step-by-Step Guide

Introduction

In today’s interconnected world, digital devices have become an integral part of our lives. The MAG device, known for its exceptional performance as a multimedia player, is widely used for streaming content. One fundamental aspect of using such devices is ensuring that the date and time are accurately set. In this article, we’ll walk you through the simple process of setting the date and time on a MAG device. What is MAG Device And what are its features?

Table of Contents

  1. Understanding the Importance of Date and Time
  2. Accessing the System Settings
  3. Navigating to Date and Time Settings
  4. Selecting Your Time Zone
  5. Manual Date and Time Configuration
  6. Enabling Automatic Date and Time Updates
  7. Troubleshooting: Time Discrepancies
  8. The Impact of Incorrect Date and Time
  9. Ensuring App Synchronization
  10. Importance for Video Streaming
  11. Customizing Date and Time Formats
  12. Taking Daylight Saving Time into Account
  13. Maintaining Accuracy Over Reboots
  14. Date, Time, and Parental Controls
  15. Conclusion

Understanding the Importance of Date and Time

Date and time settings might seem like a minor aspect of using a MAG device, but they play a crucial role in various functionalities. Accurate date and time settings ensure proper scheduling of recordings, synchronization with online content, and an enhanced overall user experience. How to set up an IPTV MAG device? 

Accessing the System Settings

To begin the process of setting the date and time on your MAG device, you need to access the system settings. This can usually be done through the device’s main menu.

Navigating to Date and Time Settings

Within the system settings, look for the “Date and Time” option. This is where you’ll find all the relevant settings to configure the date and time according to your preferences.

Selecting Your Time Zone

Select your specific time zone from the available options. This is a crucial step as it ensures that the device displays the correct time based on your geographical location.

Manual Date and Time Configuration

If you prefer manual control, you can set the date and time manually. This is useful if you want to synchronize the device with another clock you trust.

Enabling Automatic Date and Time Updates

To ensure your MAG device always displays accurate date and time, enable the automatic update feature. This will sync the device’s clock with the current time over the internet.

Troubleshooting: Time Discrepancies

If you notice any discrepancies in the displayed time, you can troubleshoot the issue by checking your internet connection and adjusting the time zone settings.

The Impact of Incorrect Date and Time

Incorrect date and time settings can lead to missed recordings, inaccurate program guides, and issues with app synchronization. It’s essential to keep these settings up-to-date.

Ensuring App Synchronization

Many apps and streaming services rely on accurate date and time information to provide personalized content recommendations and maintain synchronization.

Importance for Video Streaming

Accurate time settings are particularly important for video streaming. They ensure that you can access live content, schedule recordings, and enjoy a seamless streaming experience.

Customizing Date and Time Formats

Depending on your preference, you might be able to customize how the date and time are displayed on your MAG device.

Taking Daylight Saving Time into Account

Daylight Saving Time can affect your device’s time settings. Make sure to adjust the settings accordingly when DST begins or ends.

Maintaining Accuracy Over Reboots

Some devices might lose track of time after a reboot. Check if your device has this behavior and ensure the settings are configured to maintain accuracy.

Date, Time, and Parental Controls

In some cases, parental control features might be linked to the device’s date and time settings. Keep this in mind when configuring these settings.

Conclusion

Setting the date and time on your MAG device is a simple yet important task that can greatly enhance your user experience. By following the steps outlined in this guide, you’ll ensure accurate timekeeping, proper scheduling, and seamless synchronization with online content.

FAQs

  1. Q: Why is it important to set the date and time on my MAG device?
    • A: Accurate date and time settings are crucial for scheduling, synchronization, and overall device functionality.
  2. Q: Can I manually configure the date and time on my device?
    • A: Yes, you can manually set the date and time if you prefer that level of control.
  3. Q: How does incorrect time affect my streaming experience?
    • A: Incorrect time settings can lead to missed live content, scheduling issues, and synchronization problems.
  4. Q: What should I do if I notice a time discrepancy on my device?
    • A: Check your internet connection and verify your time zone settings to troubleshoot the issue.
  5. Q: Are date and time settings connected to parental controls?
    • A: In some cases, yes. Date and time settings might impact certain parental control features.

Great Premium IPTV Subscription

Great IPTV is the best IPTV provider with more than 10,000 channels and more than 40,000 VOD on a private server using a +10Gbps Network, Great IPTV at Great Premium IPTV is looking forward to Helping All IPTV Users to enjoy their IPTV Subscription, Great IPTV the best Premium IPTV Subscription Which you can BUY Great IPTV Subscription From Here.

In the ever-evolving landscape of entertainment and technology, IPTV (Internet Protocol Television) has emerged as a game-changer, revolutionizing the way we consume television content. But what exactly is an IPTV script or video format? In this article, we’ll delve into the depths of IPTV, exploring its script and video format, and how it has reshaped our viewing experience. What is IPTV?

Understanding IPTV Script

An IPTV script serves as the backbone of content delivery. It outlines the structure, organization, and sequencing of various media components. It dictates how the content will be presented to the user, including the arrangement of video, audio, metadata, and interactive elements.

Exploring IPTV Video Format

The video format used in IPTV plays a pivotal role in the viewing experience. Unlike conventional broadcasting, which relies on a fixed schedule, IPTV employs various video formats, such as H.264, H.265 (HEVC), VP9, and even more advanced codecs. These formats ensure efficient compression and high-quality streaming, adapting to varying internet speeds.

Advantages of IPTV Script and Video Format

The advantages of IPTV script and video format are multifaceted. They allow for dynamic content delivery, real-time updates, and interactive features that engage viewers on a deeper level. Moreover, the flexibility of script and video formats accommodates diverse devices, from smart TVs to smartphones.

Challenges and Considerations

However, the world of IPTV isn’t without its challenges. Balancing high-quality streaming with bandwidth constraints can be a hurdle. Additionally, ensuring content security and preventing unauthorized access is a continuous concern that IPTV providers must address.

How IPTV is Changing the Landscape

IPTV has disrupted traditional broadcasting, empowering users with choice and flexibility. The rise of on-demand content and interactive features has prompted cable and satellite providers to adapt, blurring the lines between television and the Internet.

The Future of IPTV

As technology evolves, so does IPTV. The future promises even more immersive experiences, with 4K and 8K streaming, augmented reality integration, and AI-driven content recommendations becoming commonplace.

IPTV vs. Traditional Broadcasting

While traditional broadcasting relies on predefined schedules, IPTV thrives on personalization. Viewers can watch what they want, when they want, transforming the TV experience from a passive one to an active and tailored journey.

Choosing the Right IPTV Script and Video Format

Selecting the right script and video format is critical for a seamless IPTV experience. Factors such as content type, target audience, and available bandwidth play a role in making the optimal choice.

Generally Used Formats in IPTV

IPTV has ushered in a new era of television broadcasting, offering viewers unparalleled access to a wide range of content. The success of IPTV is greatly attributed to its use of various video formats that ensure seamless streaming and high-quality visuals. Here are three generally used formats in the world of IPTV:

1. H.264 (Advanced Video Coding – AVC)

H.264, also known as AVC (Advanced Video Coding), is one of the most widely used video compression formats in IPTV. It strikes a balance between video quality and file size, making it efficient for streaming over the internet. With its broad compatibility, H.264 ensures smooth playback on various devices, from smartphones to smart TVs.

2. H.265 (High Efficiency Video Coding – HEVC)

H.265, or HEVC (High-Efficiency Video Coding), takes video compression to the next level. This format offers superior compression while maintaining excellent video quality, resulting in reduced bandwidth usage during streaming. HEVC is particularly beneficial for streaming high-resolution content, such as 4K and even 8K videos.

3. VP9

Developed by Google, VP9 is an open-source video compression format that aims to provide high-quality streaming while minimizing data usage. It offers competitive compression efficiency and is widely used in web-based streaming platforms. VP9’s ability to deliver quality visuals even at lower bitrates makes it a popular choice for online video content.

Most Used Streaming Scripts in the World of IPTV

In the dynamic world of Internet Protocol Television (IPTV), streaming scripts are the unsung heroes that power seamless content delivery, user management, and interactive features. These scripts are the backbone of IPTV services, ensuring that viewers can enjoy their favorite shows, movies, and live events with ease. Here are some of the most widely used streaming scripts in the realm of IPTV:

1. Xtream Codes

Xtream Codes is a highly popular and versatile streaming script that has gained widespread recognition in the IPTV industry. It provides a comprehensive platform for IPTV service providers to manage content, subscribers, billing, and more. With its user-friendly interface and robust features, Xtream Codes simplifies the process of setting up and running an IPTV service. What is Internet streaming?

2. Stalker Middleware

Stalker Middleware is a powerful streaming script that offers advanced capabilities for IPTV service management. It provides tools for content organization, user authentication, and electronic program guide (EPG) integration. Its scalability makes it suitable for both small-scale IPTV services and large-scale deployments.

3. Ministra (formerly known as Stalker Portal)

Ministra, formerly known as Stalker Portal, is a comprehensive IPTV platform that offers a wide range of features. It supports various content formats, interactive TV features, and user customization options. Ministry is favored by IPTV providers looking to offer a personalized and feature-rich viewing experience to their subscribers.

4. Flussonic Media Server

Flussonic Media Server is a robust streaming script that specializes in delivering high-quality video content over the internet. It offers adaptive streaming, DVR functionality, and support for various video formats. Flussonic is particularly suited for those who prioritize video quality and performance.

5. IPTV Smarters

IPTV Smarters is known for its user-friendly interface and compatibility with various devices. It comes with dedicated apps for different platforms, allowing users to access IPTV content on their preferred devices. IPTV Smarters is a popular choice for viewers who want a simple and intuitive IPTV experience.

6. Enigma2-based Scripts

Enigma2-based scripts are designed for devices running the Enigma2 operating system, commonly found in set-top boxes. These scripts enable IPTV streaming on Enigma2 devices, offering a seamless integration of IPTV services with the device’s native features.

7. Ezserver

Ezserver is a streaming script that supports a wide range of media formats and provides features like transcoding and content management. It offers solutions for live streaming, video on demand (VOD), and secure content delivery.

These streaming scripts are the driving force behind the IPTV revolution, allowing providers to deliver diverse content, engage viewers through interactive features, and manage their services effectively. As the IPTV industry continues to grow and evolve, these scripts will play a crucial role in shaping the future of television entertainment.

Security Measures in IPTV

Protecting content and user privacy is paramount. Encryption, digital rights management (DRM), and secure protocols are essential components of IPTV security.

IPTV’s Impact on Content Delivery

IPTV’s emergence has forced content creators and providers to rethink their strategies. Direct-to-consumer models have gained traction, allowing creators to connect with their audience more directly.

Personalization and User Experience

IPTV’s interactive nature enables personalization like never before. Viewers receive content recommendations based on their preferences, enhancing their overall experience.

IPTV in Various Industries

Beyond entertainment, IPTV finds applications in education, healthcare, and corporate communication. Live streaming of lectures, medical consultations, and company-wide announcements is now facilitated through IPTV.

Legal and Copyright Implications

IPTV’s rapid growth has raised legal questions surrounding copyright and distribution rights. Striking a balance between content availability and respecting intellectual property is an ongoing challenge.

Conclusion

In conclusion, IPTV’s script and video format have revolutionized how we consume television content. From dynamic scripting to adaptive video formats, the possibilities are vast. As technology advances and user preferences evolve, IPTV will likely continue to reshape the entertainment landscape.


Great Premium IPTV Subscription

Great IPTV is the best IPTV provider with more than 10,000 channels and more than 40,000 VOD on a private server using a +10Gbps Network, Great IPTV at Great Premium IPTV is looking forward to Helping All IPTV Users to enjoy their IPTV Subscription, Great IPTV the best Premium IPTV Subscription Which you can BUY Great IPTV Subscription From Here.

What is IPTV and Why Choose STBEmu?

IPTV, or Internet Protocol Television, is a cutting-edge technology that enables the delivery of television content over IP networks. Unlike traditional cable or satellite TV, which relies on broadcasting through physical mediums, IPTV utilizes your internet connection to provide a diverse range of channels and on-demand content. What is IPTV?

STBEmu stands for Set-Top Box Emulator. It’s an Android application that simulates the functionality of a set-top box, allowing you to access IPTV services on your Android device. With its user-friendly interface and extensive features, STBEmu has become a preferred choice for IPTV enthusiasts. What is a MAG Device?

Step-by-Step Guide to Setting Up IPTV via STBEmu on Android

Step 1: You need to download the STB emulator App from the Play Store via the link below and proceed to the next step after installing the app.

STB Emulator:https://play.google.com/store/apps/details?id=com.mvas.stb.emu.free&hl=en

STB Emulator Pro: https://play.google.com/store/apps/details?id=com.mvas.stb.emu.pro&hl=en

Step 2: On the top right corner select “Settings
If it’s the first time you open the app in the Greeting page you have “Configure Application” instead.

Step 3: Select “Profile“.

Step 4: Select “New profile“.

Step 5: You can enter any name in the profile name then Select “STB Configuration“.

Step 6: Find your Mac address here.
What is MAC address?

MAC address is a number of sorts that you are going to need to tie your device to your subscription.
It usually starts with “00:1A:79: … ”, you should provide the full MAC digits to your IPTV provider.
Privileged IPTV providers give you a dashboard to edit your IPTV subscription, in the dashboard you can add the MAC.
And if there is not any dashboard, you need to contact the IPTV provider about this case.

Tip: If the MAC you have doesn’t start with “00:1A:79: … ”,
Turn on your device and open the Application.
In the main menu select System and then System info > Select the network tab.
Write down the last 6 characters of your Mac address (For example: If your Mac address is”2A:B3:35:03:E7:36″ then you should write down 03:E7:36)
In the text field enter 00:1A:79: followed by the last six characters of your Mac address (For example 00:1A:79:03:E7:36)

Step 7Head back and select “Portal settings” click on “Portal URL” and enter the Portal address provided by your IPTV distributor.

Step 8: Head back and select “Save and restore settings“.

Step 9: Select “SAVE SETTINGS AND PROFILES“.

In the end, restart your device and the portal will load.

Enjoy Your IPTV Content

You can now enjoy your favorite IPTV content with the profile successfully created. Simply select the profile you’ve created, and you’ll have access to a world of entertainment options. Browse through channels, explore on-demand content, and experience television like never before.

Troubleshooting and Tips for a Smooth Experience

Setting up IPTV via STBEmu is generally straightforward, but if you encounter any issues, here are a few troubleshooting tips to consider:

  • Internet Connection: Ensure that your Android device is connected to a stable and high-speed internet connection to avoid buffering or playback issues.
  • Profile Configuration: Double-check the accuracy of the profile details you’ve entered. Even a minor typo can lead to connection problems.
  • App Updates: Regularly check for updates to the STBEmu app. Developers often release updates to improve performance and fix any bugs.
  • Device Compatibility: While STBEmu is compatible with various Android devices, some older models might face compatibility issues. It’s advisable to use a relatively recent device for the best experience.

Conclusion

In conclusion, the world of entertainment has evolved, and IPTV has taken center stage. With the help of the STBEmu app, setting up IPTV on your Android device has become easier than ever before. Follow the steps outlined in this guide, and you’ll be well on your way to enjoying a diverse array of television content right at your fingertips. Say goodbye to traditional cable limitations and embrace the future of television streaming.


Great Premium IPTV Subscription

Great IPTV is the best IPTV provider with more than 10,000 channels and more than 40,000 VOD on a private server using a +10Gbps Network, Great IPTV at Great Premium IPTV is looking forward to Helping All IPTV Users to enjoy their IPTV Subscription, Great IPTV the best Premium IPTV Subscription Which you can BUY Great IPTV Subscription From Here.

Introduction to IPTV and GSE App

IPTV, or Internet Protocol Television, delivers television content over the Internet rather than traditional terrestrial or satellite methods. This technology allows users to access a wide array of channels and on-demand content from around the world. GSE (Generic Smart TV Emulator) is a popular app that lets you stream IPTV content on various devices, including smartphones, tablets, and smart TVs.

Benefits of Using IPTV via Remote Playlist

Using IPTV via a remote playlist offers several advantages. You can enjoy a vast selection of channels without the need for a physical satellite dish or cable connection. Additionally, remote playlists make it convenient to access international content from any location, making IPTV an excellent choice for expats and travelers.

We will set IPTV in GSE App using Remote Playlists here, also there is another way to set IPTV in GSE App.
How to setup IPTV on GSE via Xtream-Codes API?

You can download this app via the link below:

Android devices:
https://apkpure.com/gse-smart-iptv/com.gsetech.smartiptv

iOS:
https://itunes.apple.com/us/app/gse-smart-iptv/id1028734023?mt=8

How to add IPTV channels to GSE

Step 1: Start by downloading the GSE IPTV App from Google Play Store and in the menu click on Remote Playlist.

On the down right corner click on the red circle, then Add M3U URL.

Step 2: Now select a name for your playlist and paste your M3U URL and click on “ADD“.

Step 3: Now click on the playlist you just added in order to see the channel groups.

Step 4: Now wait for the channels to be added to your application and this might take a little time depending on which countries or channels groups your M3U file contains.

Step 5: Now select the channel that you want to watch and click on “Play“.

Now your GSE Android app is ready for streaming IPTV channels on your Android device.

Troubleshooting Common Issues

6.1 Buffering or Freezing Streams

If you experience buffering or freezing, try lowering the video quality or connecting to a more stable internet connection.

6.2 Incorrect Channel Information

If channel information is incorrect, double-check the URL and login credentials you entered.

6.3 Playback Problems

For playback issues, make sure you have the latest version of the GSE app and try clearing the app’s cache.

Exploring Advanced Settings

7.1 Channel Sorting and Favorites

Explore GSE’s advanced settings to organize your channel list, create favorites, and enhance your viewing experience.

7.2 Parental Controls

GSE offers parental control options, allowing you to restrict certain content based on ratings.

Staying Updated: Keeping Your Playlist Current

Regularly update your remote playlist to ensure you have access to the latest channels and content.

Conclusion

Setting up IPTV on GSE via a remote playlist is a straightforward process that opens up a world of entertainment options. With the GSE app and a reliable remote playlist, you can enjoy a diverse range of channels and content from around the globe. Say goodbye to traditional cable and embrace the future of television streaming.

FAQs (Frequently Asked Questions)

  1. Can I use GSE on my smart TV?Yes, GSE is compatible with various smart TVs. Check the app store on your TV to see if GSE is available.
  2. Do I need a high-speed internet connection for IPTV?While a high-speed connection is recommended for optimal streaming, you can still use IPTV with a stable standard connection.
  3. Can I add multiple remote playlists to GSE?Yes, you can add multiple playlists and switch between them within the GSE app.
  4. Is IPTV legal?IPTV itself is a legal technology, but the legality of the content you access depends on the sources you use.
  5. What should I do if channels are not loading correctly?Try refreshing the playlist, checking your internet connection, and ensuring you’ve entered the correct playlist URL and credentials.

Great Premium IPTV Subscription

Great IPTV is the best IPTV provider with more than 10,000 channels and more than 40,000 VOD on a private server using +10Gbps Network, Great IPTV at Great Premium IPTV is looking forward to Helping All IPTV Users to enjoy their IPTV Subscription, Great IPTV the best Premium IPTV Subscription Which you can BUY Great IPTV Subscription From Here.

Electronic Program Guide (EPG) integration on Kodi has become an essential feature for many users who want to enhance their media streaming experience. With the ability to display upcoming program information, EPG provides valuable insights into what’s on and what’s coming up across various channels. What is EPG?

You can use Kodi on most of operating systems such as Android, Microsoft Windows, Linux, iOS, and devices such as Amazon FireTV, Smartphones, Apple TVXbox, and PC.

Choosing the Right EPG Source

Before you start adding EPG to Kodi, it’s crucial to choose a reliable EPG source. You can opt for free or paid sources, each offering different levels of accuracy and coverage. Consider factors such as channel availability, update frequency, and compatibility with Kodi. How to setup IPTV on Kodi?


How to add EPG to Kodi

Step 1: Open Kodi and click on “Add-ons“.

*Please note, the installation process is very similar in all operating systems.

Step 2: Now click on “My Add-ons” then “PVR clients“.

Step 3: Now select “PVR IPTV Simple Client“.

Step 4: Proceed to PVR IPTV Simple Client and select “Configure”.

Step 5: Select “EPG Settings”.

Step 6: On “Location” select “Remote Path (Internet address)” and enter “EPG URL” at “XMLTV URL”. You can ask for EPG URL from your IPTV provider.

Step 7: Click “OK” and reboot your KODI device.

Now TV guide will be added next to your TV channels.

Customizing and Navigating the EPG Interface

Kodi offers customization options for the EPG interface, allowing you to adjust the layout, colors, and categories according to your preferences. We’ll help you navigate these customization features, making your EPG experience more tailored to your needs.

Troubleshooting EPG Issues

Encountering issues during EPG integration is not uncommon. From missing data to incorrect listings, various problems might arise. We’ll address common troubleshooting steps and offer solutions to ensure a smooth EPG integration process.

Ensuring Regular EPG Updates

EPG data is time-sensitive and requires regular updates to remain accurate. We’ll guide you on setting up automatic updates for EPG information, ensuring that you always have the latest program schedules at your fingertips.

Using EPG Across Different Kodi Builds

Kodi comes in various builds, each with its own interface and features. We’ll discuss how to integrate EPG across different Kodi builds, making sure you can enjoy the benefits of EPG regardless of the build you’re using.

Mobile EPG Access and Synchronization

In today’s mobile-driven world, accessing EPG information on your smartphone or tablet is essential. We’ll explore options for accessing EPG data on mobile devices and syncing it seamlessly with your Kodi setup.

Exploring Advanced EPG Features

Beyond the basics, EPG offers advanced features that can enhance your media experience even further. We’ll introduce you to features like search functionalities, genre filtering, and reminders, making your EPG usage more efficient and enjoyable.

Security and Privacy Considerations

Integrating EPG might involve sharing data between different services. It’s essential to consider security and privacy implications. We’ll provide tips on safeguarding your data and ensuring a secure EPG integration process.

Comparing EPG with Online Streaming Services

EPG integration provides a unique way of accessing live TV schedules compared to online streaming services. We’ll compare the advantages of EPG with those of streaming platforms, helping you make an informed choice for your entertainment needs.

Future Developments in EPG Technology

The world of EPG technology is ever-evolving. We’ll discuss potential future developments, such as improved data accuracy, real-time updates, and integration with emerging entertainment technologies.

Conclusion

Incorporating EPG on Kodi opens up a world of convenience and organization in your media consumption. With easy access to program schedules and enhanced customization options, EPG integration enriches your entertainment experience. Follow the steps outlined in this guide to seamlessly add EPG to your Kodi setup and elevate your media streaming game.

FAQs

  1. Can I use multiple EPG sources on Kodi? Yes, you can configure Kodi to use multiple EPG sources, providing a broader range of program information.
  2. Is EPG integration legal? Yes, EPG integration itself is legal. However, ensure that you’re using EPG data from legitimate sources.
  3. Do all Kodi add-ons support EPG integration? Not all add-ons support EPG integration. Make sure to choose add-ons that are compatible with EPG features.
  4. How often should I update my EPG data? It’s recommended to set up daily or weekly automatic updates to ensure the accuracy of your EPG information.
  5. Can I access EPG on Kodi without an internet connection? No, EPG data requires an internet connection to update and display the latest program schedules.

Great Premium IPTV Subscription

Great IPTV is the best IPTV provider with more than 10,000 channels and more than 40,000 VOD on a private server using +10Gbps Network, Great IPTV at Great Premium IPTV is looking forward to Helping All IPTV Users to enjoy their IPTV Subscription, Great IPTV the best Premium IPTV Subscription Which you can BUY Great IPTV Subscription From Here.

MAG Box, a well-known IPTV set-top box, offers a seamless way to enjoy a plethora of channels. The user interface is simple and responsive, channel switching is quick and you receive all the features required to get the most out of your IPTV service. However, if you’re wondering how to record IPTV on MAG Box, you’re in the right place. In this guide, we’ll walk you through the process step by step, ensuring you never miss your favorite shows and events. How to set up IPTV on a MAG device?

Introduction to IPTV and MAG Box

IPTV, or Internet Protocol Television, is a modern way of delivering television content over the Internet rather than traditional cable or satellite methods. MAG Box is a popular IPTV set-top box that enables users to access a wide range of channels, on-demand content, and other multimedia services.

Benefits of Recording IPTV on MAG Box

Recording IPTV on your MAG Box offers numerous advantages. You can capture your favorite shows, movies, and live events for later viewing. This eliminates the need to worry about missing out on content due to conflicting schedules.

Understanding Recording Formats (H.264 vs. H.265)

When recording IPTV content on your MAG Box, it’s essential to choose the right recording format. H.264 and H.265 are two common compression standards. H.265 offers higher efficiency, maintaining video quality while reducing file sizes.

Setting Up Your MAG Box for Recording

Before you start recording, ensure your MAG Box is set up correctly. Connect it to your TV and internet, then navigate to the settings to configure your recording preferences.

Recording Live IPTV Streams

To record a live IPTV stream on your MAG Box, follow these steps:

  1. Tune in to the channel you want to record.
  2. Press the ‘Rec’ button on your remote.
  3. The recording will start, and you can press ‘Stop’ to end it.

Scheduling Recordings for Future Playback

MAG Box allows you to schedule future recordings effortlessly:

  1. Access the EPG (Electronic Program Guide).
  2. Locate the desired program.
  3. Press the ‘Rec’ button to schedule the recording.

Managing Recorded Content

You can manage your recorded content in the ‘Recordings’ or ‘My Recordings’ section of the MAG Box interface. From here, you can play, delete, or organize your recordings.

Transferring Recordings to External Storage

Running out of storage space? Transfer your recordings to an external USB drive or network-attached storage (NAS) device. This ensures you never lose your precious content.

How to record on MAG BOX?

Step 1: Start by selecting the channel that you want to record and press the red button on your remote controller.

Step 2: Now press the red button on the program that you want to record and click on “YES“.

Step 3: You can see now that the programs you placed recordings on are now marked with a tiny little red dot as depicted via a red arrow in the below picture.

Step 4: Now in order to access your recorded contents, head back to the main menu and select “RECORDINGS“.

Step 5: You can now click on any recorded program from the list and start the video. You can also delete unwanted recordings by pressing the red button on it.

And that was the entire process of recording TV programs on your MAG box.

Troubleshooting Recording Issues

Encountering recording problems? Ensure your MAG Box firmware is up to date and that you have sufficient storage space. If issues persist, contact MAG Box support for assistance.

Enhancing Recording Quality

For optimal recording quality, make sure you have a stable internet connection. Higher internet speeds can lead to smoother playback and better recording quality.

Ensuring Sufficient Storage Space

Regularly check your available storage space. Delete unnecessary recordings or transfer them to external storage to free up room for new content.

Exploring Third-Party Recording Options

While the MAG Box offers native recording capabilities, you can also explore third-party apps or devices that enhance recording features and options.

Legal Considerations for Recording IPTV

It’s crucial to understand the legal implications of recording IPTV content. Make sure you’re aware of copyright laws and usage rights before recording and sharing content.

Conclusion

Recording IPTV on a MAG Box is a fantastic way to personalize your entertainment experience. With the ability to capture and schedule your favorite content, you’re in control of what you watch and when. Follow the steps outlined in this guide to unlock the full potential of your MAG Box’s recording capabilities.

FAQs

1. Can I record multiple IPTV streams simultaneously?

No, most MAG Boxes typically support recording one stream at a time.

2. What’s the difference between internal and external recording storage?

Internal storage refers to the built-in storage of the MAG Box, while external storage involves using USB drives or NAS devices.

3. Can I watch a recorded show while simultaneously recording another?

Yes, many MAG Boxes allow you to watch a recorded show while recording a different channel.

4. Are there any subscription services that offer cloud-based IPTV recording?

Yes, some IPTV service providers offer cloud-based recording as part of their subscription packages.

5. Can I transfer my recordings to a computer for backup?

In most cases, recordings made on a MAG Box can’t be directly transferred to a computer due to compatibility issues. However, you can use external storage for backup purposes.


Great Premium IPTV Subscription

Great IPTV is the best IPTV provider with more than 10,000 channels and more than 40,000 VOD on a private server using +10Gbps Network, Great IPTV at Great Premium IPTV is looking forward to Helping All IPTV Users to enjoy their IPTV Subscription, Great IPTV the best Premium IPTV Subscription Which you can BUY Great IPTV Subscription From Here.

In this age of digital streaming and advanced television technology, many individuals find themselves pondering over a common question: “I have an old TV, can I still access IPTV services?” IPTV, or Internet Protocol Television, has revolutionized the way we consume television content, offering a wide array of channels and on-demand options through the Internet. However, the compatibility of IPTV services with older television models is a valid concern. Let’s delve into this query and explore the possibilities.

Old TV Show

Table of Contents

  1. Introduction
  2. Understanding IPTV
  3. Old TV Compatibility with IPTV Services
    • 3.1 Decoding the Terminology: CRT vs. Flat Panel
    • 3.2 The Role of HDMI and AV Inputs
    • 3.3 Internet Connectivity Requirements
  4. Options for Accessing IPTV on an Old TV
    • 4.1 External Streaming Devices
    • 4.2 Smart Set-top Boxes
    • 4.3 Converting Signals for CRT TVs
  5. Factors to Consider When Choosing an Option
    • 5.1 Budget Constraints
    • 5.2 User-Friendly Interface
    • 5.3 Available Features and Content
  6. Step-by-Step Guide: Setting Up IPTV on an Old TV
    • 6.1 Selecting the Right Device
    • 6.2 Connecting the Device to Your TV
    • 6.3 Configuring Network Settings
    • 6.4 Installing IPTV Apps
  7. Enhancing Your Viewing Experience
    • 7.1 High-Quality Streaming
    • 7.2 Using a Universal Remote
    • 7.3 Organizing Channels and Favorites
  8. The Future of Television: Is Upgrading Worth It?
  9. Conclusion

Introduction

As technology evolves, so does our television experience. IPTV has emerged as a popular alternative to traditional cable and satellite TV services. However, for those with older TV sets, the concern remains: Can you access IPTV services on these vintage screens? Let’s uncover the truth behind this query.

Understanding IPTV

Before we delve into compatibility concerns, let’s understand what IPTV is. IPTV is a digital television broadcasting protocol that delivers television content and on-demand services through Internet networks. Unlike conventional cable TV, IPTV uses your internet connection to stream content, providing a vast array of channels, shows, and movies.

Old TV Compatibility with IPTV Services

3.1 Decoding the Terminology: CRT vs. Flat Panel

When we refer to “old TVs,” we’re usually talking about CRT (cathode ray tube) televisions, which were prevalent before flat-panel technologies like LCD and LED took over. The physical differences between these TVs impact their compatibility with modern devices.

3.2 The Role of HDMI and AV Inputs

Modern streaming devices and set-top boxes often connect through HDMI ports, which are absent in older CRT TVs. However, older TVs usually have AV inputs, presenting a glimmer of hope for compatibility.

3.3 Internet Connectivity Requirements

IPTV services require a stable internet connection for seamless streaming. This requirement holds true for both old and new TVs, leveling the playing field.

Options for Accessing IPTV on an Old TV

4.1 External Streaming Devices

External streaming devices like Roku, Amazon Fire Stick, and Google Chromecast can bridge the compatibility gap. These devices connect to your TV through available ports and bring IPTV apps to your screen.

4.2 Smart Set-top Boxes

Smart set-top boxes, such as Apple TV and Android TV, offer a comprehensive IPTV experience. They come equipped with various apps and can connect to both CRT and flat-panel TVs.

4.3 Converting Signals for CRT TVs

Signal converters and AV-to-HDMI adapters can help connect modern streaming devices to older TVs. These devices convert HDMI signals into AV signals compatible with CRT TVs.

Factors to Consider When Choosing an Option

5.1 Budget Constraints

External streaming devices are often budget-friendly, while smart set-top boxes might be pricier but offer more features.

5.2 User-Friendly Interface

Consider the device’s ease of use, especially if you’re not tech-savvy. Smart set-top boxes generally offer more user-friendly interfaces.

5.3 Available Features and Content

Evaluate the apps and features each option provides. Some devices offer additional streaming services beyond IPTV.

Step-by-Step Guide: Setting Up IPTV on an Old TV

6.1 Selecting the Right Device

Choose a compatible device based on your TV’s available inputs and your preferences.

6.2 Connecting the Device to Your TV

Follow the manufacturer’s instructions to connect the chosen device to your TV.

6.3 Configuring Network Settings

Connect the device to your Wi-Fi network and ensure a stable internet connection.

6.4 Installing IPTV Apps

Download and install your preferred IPTV apps from the device’s app store.

Enhancing Your Viewing Experience

7.1 High-Quality Streaming

Ensure you have a reliable and high-speed internet connection for uninterrupted streaming.

7.2 Using a Universal Remote

Consider using a universal remote to simplify the control of your TV and connected streaming device.

7.3 Organizing Channels and Favorites

Take advantage of features that allow you to organize your channels and mark favorites for easy access.

The Future of Television: Is Upgrading Worth It?

With the rapid pace of technological advancement, upgrading to a newer TV might be a worthy investment for a superior IPTV experience.

Conclusion

In conclusion, if you have an old TV, you can still access IPTV services with the right setup. Modern external streaming devices, smart set-top boxes, and signal converters provide viable solutions to bring the world of IPTV to your vintage screen. Evaluate your options, consider your preferences, and embark on a journey to enjoy the wonders of digital streaming.

FAQs

  1. Can I access IPTV on a CRT TV? Yes, you can use signal converters or AV-to-HDMI adapters to connect modern streaming devices to CRT TVs.
  2. Do smart set-top boxes work with flat-panel TVs only? No, smart set-top boxes can connect to both CRT and flat-panel TVs.
  3. Are external streaming devices easy to set up? Yes, external streaming devices usually come with simple setup instructions.
  4. Do I need an internet connection for IPTV on an old TV? Yes, a stable internet connection is necessary for streaming IPTV content.
  5. Should I consider upgrading to a new TV for IPTV? Upgrading to a new TV with modern features can enhance your IPTV experience, but it’s not mandatory.

Great Premium IPTV Subscription

Great IPTV is the best IPTV provider with more than 10,000 channels and more than 40,000 VOD on a private server using +10Gbps Network, Great IPTV at Great Premium IPTV is looking forward to Helping All IPTV Users to enjoy their IPTV Subscription, Great IPTV the best Premium IPTV Subscription Which you can BUY Great IPTV Subscription From Here.

Catch-up functionality on MAG (IPTV set-top boxes, such as those provided by Infomir) allows you to watch previously aired content even if you missed the live broadcast. This feature is especially useful for catching up on TV shows, movies, or other programs that were recently broadcasted

Introduction to Catch-up on MAG

Catch-up on MAG refers to the feature that allows you to access previously aired TV shows, movies, or other content. This feature is particularly useful when you’ve missed a live broadcast and want to catch up at your convenience. MAG boxes, known for their reliability and user-friendly interface, offer a streamlined way to enjoy catch-up content.

Setting Up Your MAG Box

Before you can start using catch-up on MAG, you need to ensure your MAG box is properly set up. This involves connecting the box to your TV and the internet. Follow the manufacturer’s instructions for a hassle-free setup process.

Navigating the Catch-up Section

Once your MAG box is set up, navigate to the catch-up section. This is usually found in the main menu. The catch-up section is designed to display available content in an organized manner, making it easy for you to find what you’re looking for.

Selecting and Playing Catch-up Content

Scroll through the list of available catch-up content and select the show or movie you want to watch. Click on the title to start playing the content. MAG boxes offer high-quality streaming, ensuring an enjoyable viewing experience.

Pausing, Rewinding, and Fast Forwarding

While watching catch-up content, you have full control over playback. Pause the content if you need to take a break, or rewind and fast forward to navigate within the video. This level of control adds convenience to your catch-up experience.

Managing Catch-up Settings

MAG boxes allow you to customize your catch-up settings. You can adjust playback quality, enable subtitles, or choose your preferred language. These settings enhance your viewing experience according to your preferences.

Using EPG for Catch-up

Electronic Program Guide (EPG) is a feature that displays the TV schedule. Some MAG boxes integrate EPG with catch-up, allowing you to select content directly from the guide and watch what you’ve missed. What is EPG?

Tips for an Optimal Catch-up Experience

  • Ensure a stable internet connection for uninterrupted streaming.
  • Clear the cache regularly to improve performance.
  • Organize your favorite shows for quick access.
  • Update your MAG box firmware to enjoy the latest features.

How to Use Catch-up on MAG: A Step-by-Step Guide

In this tutorial, we are going to show you how to use the time shift or catch up feature with your MAG device. How to setup IPTV on a MAG device?
As displayed in the below picture, channels that have catch-up available, are marked with a clock next to their names.

Step 1: In order to watch previously recorded content by using the catch-up feature, click on the right arrow on your remote control to open the TV guide.

Step 2: After opening the TV guide you will see the available content for the catch-up feature with a yellow dot on it as depicted in the below picture.

Step 3: Select the desired content and press OK on your remote control.

Please note, contents that are not marked with a yellow dot are not yet available for using the catch-up feature.

Please note that the steps and terminology might differ slightly based on the specific MAG IPTV box model and the software version it’s running. If you’re having trouble using the Catch-up feature, it’s recommended to consult the user manual that came with your MAG IPTV box or reach out to the manufacturer’s customer support for assistance.

Troubleshooting Common Issues

Encountering technical glitches is not uncommon. If you face issues like buffering or freezing, try restarting your MAG box and checking your internet connection. You can also reach out to customer support for assistance.

Staying Updated with the Latest Features

Manufacturers often release updates to enhance the functionality of MAG boxes. Stay informed about these updates and new features to continually improve your catch-up experience.

Comparison with Other Catch-up Methods

While catch-up on MAG offers a convenient way to enjoy missed content, it’s worth comparing with other methods like streaming apps or DVRs. Consider the pros and cons of each to find what suits you best.

Exploring Premium Catch-up Services

Some MAG boxes offer access to premium catch-up services with exclusive content. Explore these options if you’re looking for a wider range of shows and movies.

The Future of Catch-up Technology

As technology evolves, so does catch-up functionality. Keep an eye on upcoming trends and innovations in the catch-up domain for exciting developments.

Safety and Security Measures

When using catch-up on MAG, prioritize safety. Be cautious of phishing attempts or suspicious links related to catch-up content. Stick to official sources and avoid sharing personal information.

Conclusion

Catch-up on MAG is a game-changer for those who want flexibility in their entertainment consumption. With its user-friendly interface, customizable settings, and control features, catching up on your favorite shows and movies has never been easier. Embrace the convenience of MAG boxes and never miss out on the excitement again.

FAQs

Q1: Can I watch catch-up content without an internet connection?

A: No, a stable internet connection is required to stream catch-up content on MAG.

Q2: How often should I update my MAG box firmware?

A: It’s recommended to check for updates every few months to ensure you have the latest features.

Q3: Are there any subscription fees for using catch-up on MAG?

A: While some MAG boxes offer free catch-up content, others may require subscription fees for premium services.

Q4: Can I fast-forward through advertisements in catch-up content?

A: Depending on the catch-up service, you may encounter ads that cannot be skipped.

Q5: Is catch-up available for all TV channels?

A: The availability of catch-up content depends on the TV channels and agreements with the service provider.


Great Premium IPTV Subscription

Great IPTV is the best IPTV provider with more than 10,000 channels and more than 40,000 VOD on a private server using +10Gbps Network, Great IPTV at Great Premium IPTV is looking forward to Helping All IPTV Users to enjoy their IPTV Subscription, Great IPTV the best Premium IPTV Subscription Which you can BUY Great IPTV Subscription From Here.

In today’s fast-paced digital landscape, entertainment options have expanded beyond traditional cable television. Internet Protocol Television (IPTV) is rapidly gaining popularity, offering a convenient way to access a wide range of channels and content through an internet connection. AVOV TVOnline Box is a popular device that allows users to enjoy IPTV seamlessly. In this guide, we will walk you through the step-by-step process of setting up IPTV on your AVOV TVOnline Box for an enhanced viewing experience.

Introduction to AVOV TVOnline Box and IPTV

AVOV TVOnline Box is a versatile device that transforms your regular television into a smart entertainment hub. IPTV delivers television content over the internet, offering a more flexible and customizable viewing experience compared to traditional cable or satellite TV.

Preparing for IPTV Setup

Before diving into the setup process, ensure you have the following:

  • AVOV TVOnline Box
  • Stable internet connection
  • Active IPTV subscription
  • HDMI cable
  • Television set

Connecting AVOV TVOnline Box to Your Television

Connect the AVOV TVOnline Box to your TV using an HDMI cable. Power on both devices and ensure they are properly connected.

Configuring Network Settings

Access the system settings of your AVOV TVOnline Box and connect it to your Wi-Fi network or router using an Ethernet cable.

Setting Up IPTV on AVOV TVOnline Box

Accessing the System Settings

Navigate to the main menu and find the “Settings” option. Select “System” to access the system settings.

Navigating to the IPTV Section

Within the system settings, locate the “IPTV” section. This is where you will input the necessary details to set up your IPTV service.

Entering IPTV Server Details

Enter the provided IPTV server URL, username, and password. These details are typically provided by your IPTV service provider. How to find Server Address in M3U Url?

Saving and Activating IPTV Channels

Save the entered server details and exit the settings. Your AVOV TVOnline Box will now connect to the IPTV server and retrieve available channels.

How to add IPTV channels to AVOV

Step 1: Start by clicking on the “Live TV” icon from the main menu. If you are doing this for the first, it will bring you to the server setting section. If the server setting section doesn’t appear automatically, follow the below steps.

Step 2: Go to the “Settings” section from the main menu.

Step 3: Now select “SERVER SETTING” and proceed to the next section.

Step 3: Now in the “Server Name” insert a name and it can be anything you want in the “Server URL” insert the postal address which can be obtained from your IPTV provider and then click on “Connect“. Your device’s Mac address must be registered inside the IPTV provider server.

Please note, you can also use a username and password inside your m3u line and connect to the servers. However, using the MAG portal is way simpler.

Step 4: You can see now that the channels are being loaded to your set up box.

Step 5: Now head back to the main menu and click on the “Live TV” icon.

Step 6: You can now click on any channel based on each category and start watching live channels.

Exploring IPTV Features on AVOV TVOnline Box

Channel Surfing and EPG

Use the remote control to navigate through the channel list. The Electronic Program Guide (EPG) will display program schedules for easy content discovery. What is EPG?

Video on Demand (VOD) Library

Explore the Video on Demand section to access a library of movies and shows. Enjoy on-demand entertainment at your convenience. What is Video on Demand?

Catch-Up TV Functionality

Missed your favorite show? Many IPTV services offer catch-up TV, allowing you to watch previously aired content.

Troubleshooting Common Issues

If you encounter buffering or playback issues, check your internet connection and ensure your AVOV TVOnline Box is updated with the latest firmware.

Optimizing Your IPTV Experience

Enhance your experience by connecting your AVOV TVOnline Box to a high-speed internet connection and using an Ethernet cable for stable connectivity.

Conclusion

Setting up IPTV on your AVOV TVOnline Box opens the door to a world of entertainment possibilities. Enjoy the flexibility of IPTV, access to various channels, and the convenience of on-demand content.

FAQs (Frequently Asked Questions)

  1. Can I use any IPTV subscription with AVOV TVOnline Box?
    • Yes, as long as your IPTV service provider supports the AVOV TVOnline Box, you can use their subscription.
  2. What is the advantage of catch-up TV?
    • Catch-up TV allows you to watch shows and programs that you missed at their scheduled airing time, adding convenience to your viewing experience.
  3. Are software updates important for my AVOV TVOnline Box?
    • Yes, regular software updates ensure optimal performance, security, and access to new features.
  4. Can I watch IPTV on multiple devices simultaneously?
    • Some IPTV subscriptions allow multi-device usage. Check with your provider for specific details.
  5. Is a wired or wireless connection better for IPTV?
    • A wired Ethernet connection provides more stable and consistent streaming compared to wireless, which can be affected by signal strength and interference.

Great Premium IPTV Subscription

Great IPTV is the best IPTV provider with more than 10,000 channels and more than 40,000 VOD on a private server using +10Gbps Network, Great IPTV at Great Premium IPTV is looking forward to Helping All IPTV Users to enjoy their IPTV Subscription, Great IPTV the best Premium IPTV Subscription Which you can BUY Great IPTV Subscription From Here.