Year: 2023

What is SET IPTV?

SET IPTV is an IPTV (Internet Protocol Television) service that allows users to stream television channels and content over the Internet. IPTV delivers television programming through an internet connection instead of traditional terrestrial, satellite, or cable formats.
You can SET IPTV on various devices, including Smart TVs, smartphones, tablets, and PC.

With SET IPTV, users can enjoy various TV channels, including live TV broadcasts, on-demand content, movies, TV shows, and more. The service typically requires a subscription from an IPTV provider who offers access to the desired channels and content.
Users can usually customize their channel lists, create playlists, and access additional features provided by the SET IPTV application.

How to install SET IPTV on my Smart TV?

To install SET IPTV on your Smart TV, you can follow the steps below:

  1. Check Compatibility: Confirm if your Smart TV supports the installation of third-party apps. SET IPTV may not be available on all Smart TV platforms.
  2. Enable Unknown Sources: If your Smart TV allows the installation of third-party apps, you might need to enable the “Unknown Sources” option. This option is typically found in the settings or security section of your Smart TV.
  3. Obtain the SET IPTV App: You can either download the SET IPTV app directly from the official app store on your Smart TV (if available), or you can download the app from a trusted source on your computer and transfer it to a USB drive.
  4. Install SET IPTV: If you have downloaded the app on your computer, transfer it to a USB drive. Insert the USB drive into the USB port on your Smart TV. Navigate to the USB drive through the file manager app on your Smart TV, locate the SET IPTV app file, and select it to begin the installation process. Follow the on-screen prompts to complete the installation.
  5. Launch and Set Up: Once the installation is complete, you should be able to find the SET IPTV app in your list of installed apps. Launch the app and follow the on-screen instructions to set up your IPTV service. You may need to provide your IPTV provider’s login credentials or configure the app with the necessary settings.

How to install SET IPTV on Android?

To install SET IPTV on an Android device, you can follow the steps below:

  1. Enable Unknown Sources: By default, Android devices block the installation of apps from unknown sources. To enable this option, go to your device’s Settings, then select Security or Privacy (depending on your Android version). Look for the “Unknown Sources” option and toggle it on.
  2. Obtain the SET IPTV APK: Visit the official SET IPTV website or other trusted sources to download the SET IPTV APK file. You must download it from a reliable source to avoid malware or unauthorized versions.
  3. Locate the APK File: Once the APK file is downloaded, open the file manager app on your Android device. Navigate to the Downloads folder or the location where the SET IPTV APK file is saved.
  4. Install the SET IPTV App: Tap on the APK file to begin the installation. You may receive a security prompt warning you about the installation from unknown sources. Confirm the installation by tapping “Install” or “Next.”
  5. Complete the Installation: Wait for the installation process to finish. Once completed, you’ll see a notification indicating that the app has been installed successfully.
  6. Launch SET IPTV: Locate the SET IPTV app icon in your app drawer or home screen and tap on it to launch the application.
  7. Set Up SET IPTV: When you first launch SET IPTV, you may need to provide your IPTV provider’s login credentials or configure the app with the necessary settings. Follow the on-screen instructions to complete the setup process.

After completing these steps, you should be able to use SET IPTV on your Android device to access IPTV channels and enjoy your favorite content.

How to install SET IPTV on Firestick?

To install SET IPTV on Firestick, you can follow these steps:

  1. Prepare Firestick: Ensure your Firestick is properly set up and connected to your TV.
  2. Enable Unknown Sources: From the Firestick home screen, navigate to “Settings” in the top menu bar. Select “My Fire TV” or “Device” (depending on your Firestick version). Choose “Developer Options” and enable “Apps from Unknown Sources.”
  3. Install Downloader App: Return to the Firestick home screen and use the search function to find and install the “Downloader” app. This app will allow you to download the SET IPTV APK.
  4. Launch Downloader: Open the Downloader app once it’s installed. You’ll be prompted to grant permission to access files on your device. Select “Allow” to proceed.
  5. Download SET IPTV APK: In the Downloader app, enter the following URL:
    https://www.setiptv-apk.com/.
    This is the official SET IPTV website where you can find the latest version of the SET IPTV APK. Once the website loads, navigate to the Downloads section and click on the APK file to start the download.
  6. Install SET IPTV: After the SET IPTV APK is downloaded, the Downloader app will prompt you to install it. Click on “Install” to proceed.
  7. Launch SET IPTV: Once the installation is complete, you can either choose “Open” from the installation prompt or go to the Firestick home screen and select the SET IPTV app from your app list.
  8. Set Up SET IPTV: When you first launch SET IPTV, you may need to provide your IPTV provider’s login credentials or configure the app with the necessary settings. Follow the on-screen instructions to complete the setup process.

After completing these steps, you should be able to use SET IPTV on your Firestick to access IPTV channels and enjoy your favorite content.
How to SET up  IPTV subscription on SET IPTV

To set up your IPTV subscription on SET IPTV, you can follow these general steps:

  1. Obtain Subscription Details: Ensure you have purchased an IPTV subscription from a reliable provider. Your provider should provide you with the necessary information, such as a username, password, and server URL or playlist file.
  2. Launch SET IPTV App: Open the SET IPTV app on your device. If you haven’t installed the app yet, please refer to the instructions specific to your device to install SET IPTV.
  3. Access Settings: Once the app is launched, locate the settings or gear icon within the app. It is usually found in the upper-right corner of the screen.
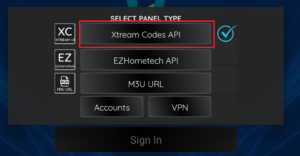
  4. Enter Subscription Information: In the settings menu, look for the “Add Playlist” or “Add Xtream Codes” option. Select it to enter your subscription details.
  5. Choose Playlist Type: Depending on your subscription, you may need to select the appropriate playlist type, such as M3U, Xtream Codes, or Portal URL. Consult your IPTV provider for the specific playlist type you need to use.
  6. Enter Subscription Details: Enter the required information for your IPTV subscription, which typically includes the server URL, username, and password. If you have a playlist file, you may need to upload it or provide the file’s location.
  7. Save and Load Playlist: After entering the subscription details, save the settings. The app may prompt you to reload the playlist or restart the app. Follow the instructions to load the playlist.
  8. Access IPTV Channels: Once the playlist is loaded, you should be able to access your IPTV channels within the SET IPTV app. Navigate through the app’s interface to browse and play the available channels and content.

Ways to use Xtream codes:

To connect via Xtream-codes connection, clients need 3 main items :

  • Portal URL (Its included 3 sections: Schema, Host, and port )
  • Username
  • Password

These details must provide by the IPTV provider to the client, but you can extract these details from M3u Link too. (see the example from over box IPTV provider)

As in the first method (using the m3u link), you follow the same steps (1, 2, 4, and 5), and in the third step click on the Xtream-codes message to display the fields to fill in your subscription details.

You must activate the verification code (I am not a robot) and click Send. Restart your TV and turn on SET IPTV again to enjoy thousands of TV channels, movies, and series.

Enabling SET IPTV

SET IPTV activation will be completed on the application developer’s website, here is the direct link: https://setsysteme.com/act.app

Note: SET IPTV does not contain any playlists, you will need to upload your own playlists. The developer of the SET IPTV application is not responsible for the content of the application you upload.


Great Premium IPTV Subscription

Great IPTV is the best IPTV provider with more than 10,000 channels and more than 40,000 VOD on a private server using +10Gbps Network, Great IPTV at Great Premium IPTV is looking forward to Helping All IPTV Users to enjoy their IPTV Subscription, Great IPTV the best Premium IPTV Subscription Which you can BUY Great IPTV Subscription From Here.

Kodi addon refers to an extension or plugin that can be installed on the Kodi media center platform. You can think of a Kodi Addon as a base application that increases the functionality of the main application.

Addons in Kodi enhance its functionality by providing additional features, content sources, and customization options. This enables users to access streaming services, online content, live TV channels, radio stations, and more directly from within the Kodi interface. How to set up IPTV on KODI?

Kodi addons are available in various categories: Video, Music, Program, and Skin. Video addons, for example, allow users to access content from popular streaming platforms, such as Netflix, YouTube, and Amazon Prime Video, or from unofficial sources that provide free movies and TV shows.

Music addons give access to online music services, radio stations, and music libraries. Programs offer additional functionality like backup utilities, weather information, and gaming emulators. Skin addons allow users to customize the visual appearance of the Kodi interface.

Kodi addons come in a .zip format and can be connected with very little work by utilizing the addons section below the settings tab inside Kodi.

It’s important to note that while Kodi itself is legal software, some third-party addon may provide access to copyrighted content without proper authorization. Therefore, it’s essential to use add-ons responsibly and adhere to copyright laws and regulations in your region.

Kodi Repository

Kodi repository or “repo” is a feature that includes various Kodi addons that are split up into different sections. You can find more information at:

https://kodi.tv/addons

With a repository, addons are constantly being updated once a brand-new or greater version has been released. Kodi repositories are additionally installed like different add-ons, by a .zip file inside the Kodi settings section.

What is a Wizard in Kodi?

In the context of Kodi, a wizard refers to a specialized type of addon that provides a streamlined and user-friendly way to configure and customize the Kodi media center. A Kodi wizard usually combines multiple tools, settings, and addons into a single package, making it easier for users to set up and personalize their Kodi experience.

Installing a wizard addon in Kodi typically guides you through a series of steps or prompts, offering various options and configurations along the way. These options may include selecting a specific skin or theme for Kodi, installing popular addons, configuring settings for video and audio playback, enabling automatic updates, and more. Wizards often provide a range of customization choices to suit different preferences and needs.

The main purpose of a Kodi wizard is to simplify the initial setup process and make it more accessible, especially for users who are new to Kodi or prefer a more streamlined approach. It can save time and effort by automating certain tasks and offering pre-configured settings.

ARES Wizard

ARES Wizard is a Kodi add-on that provides you with the tools you need to lower the buffering issues while watching IPTV streams as well as doing maintenance, getting back up, and doing a factory reset on your Kodi.

IPTV Simple Client

IPTV Simple Client is a Kodi addon that allows you to stream live TV channels and access IPTV (Internet Protocol Television) services within the Kodi media center. It is a built-in addon that comes pre-installed with Kodi and is available in the official Kodi repository.

With IPTV Simple Client, you can configure and set up IPTV playlists or m3u files that contain the URLs of various live TV channels. These playlists can be obtained from IPTV providers or generated manually. Once configured, IPTV Simple Client retrieves the channel list from the specified playlist and enables you to browse and watch live TV channels directly within the Kodi interface.

To use IPTV Simple Client, you need to provide a valid IPTV playlist URL or path to a local m3u file. You can customize settings such as channel logos, EPG (Electronic Program Guide) data, and video playback options. The addon supports various streaming protocols, including HTTP, MMS, RTSP, and HLS.

Conclusion
Kodi addons greatly enhance the functionality and versatility of the Kodi media player, allowing users to customize their entertainment experience. With a wide range of addons available, users can access streaming services, music platforms, sports content, and more, all within the Kodi interface.

FAQs

1. Are Kodi addons legal?

Kodi addons themselves are legal. However, the legality of streaming-specific content depends on the source and whether you have proper authorization to access it. Streaming copyrighted content without permission is illegal and can have legal consequences.

2. How do I install addons on Kodi?

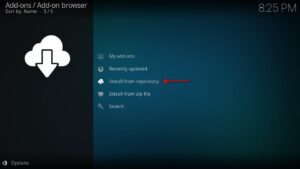
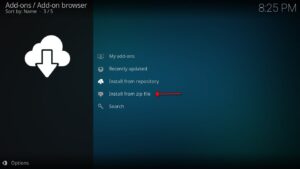
To install addons on Kodi, you can access the official Kodi repository or trusted third-party sources. Within Kodi, navigate to the “Add-ons” section, choose “Install from repository” or “Install from zip file,” and select the addon you want to install. Follow the on-screen instructions to complete the installation.

3. Can I use multiple addons on Kodi?

Yes, Kodi allows users to install and use multiple addons simultaneously. This enables you to access a wide range of content and features from different sources within the same media player.

4. Can I uninstall addons from Kodi?

Yes, you can uninstall addons from Kodi at any time. In the “Add-ons” section, select “My add-ons,” choose the addon you want to uninstall, and click the “Uninstall” option. Confirm the action and the addon will be removed from your Kodi installation.

5. How can I keep my Kodi addons updated?

Kodi addons can be updated automatically or manually. To enable automatic updates, go to the “Settings” menu, select “Add-ons,” and toggle on the “Auto-update add-ons” option. For manual updates, you can check for available updates in the “Add-ons” section and install them individually.


Great Premium IPTV Subscription

Great IPTV is the best IPTV provider with more than 10,000 channels and more than 40,000 VOD on a private server using +10Gbps Network, Great IPTV at Great Premium IPTV is looking forward to Helping All IPTV Users to enjoy their IPTV Subscription, Great IPTV the best Premium IPTV Subscription Which you can BUY Great IPTV Subscription From Here.
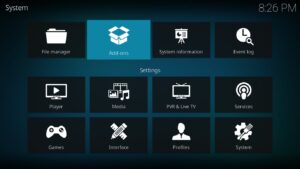
Kodi is a free and open-source media player software application. It was originally developed as a home entertainment platform for the Xbox game console, known as Xbox Media Center (XBMC), but has since evolved into a cross-platform media center that can be used on various devices and operating systems.

Kodi‘s versatility and open nature have made it popular among media enthusiasts and home theater PC (HTPC) users. It can be installed on devices such as Android, Microsoft Windows, Linux, iOS, and devices such as Amazon FireTV, Smartphones, Apple TV, Xbox, and PC, smart TVs, and Raspberry Pi, among others.

How to bring IPTV channels to Kodi

To bring IPTV channels to Kodi, you can use an add-on specifically designed for IPTV streaming. Here’s a general step-by-step guide on how to do it:

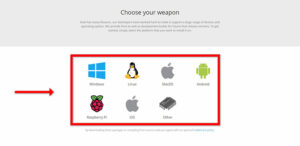
Step 1: Start by downloading Kodi based on your operating system:
https://kodi.tv/download.
In this case, we select “Windows“.

*Please note, here we guide how to set up IPTV in Kodi in Windows but the installation process is very similar in all operating systems.

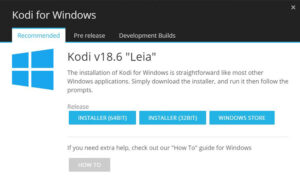
Step 2: Select 64 Bit or 32 Bit based on your operating system. What is Kodi Add-on?

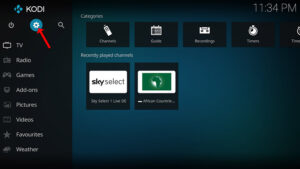
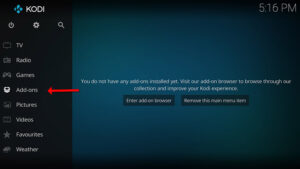
Step 3: After installing and opening it, click on “Add-ons“.

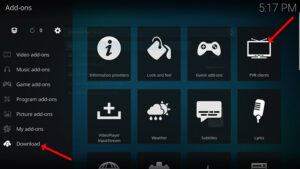
Step 4: Now click on “Download” then select “PVR clients“.

Note: We are going to download and install the PVR add-on here, after installing no need to go to the “Download“.
You can find the installed add-ons “My add-ons

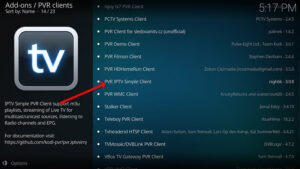
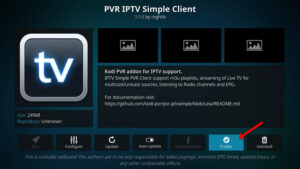
Step 5: Select “PVR IPTV Simple Client“.

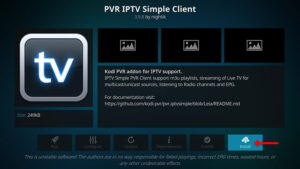
Step 6: Now click on “Install“.

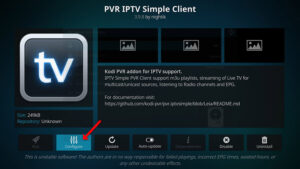
Step 7: After installing “PVR IPTV Simple Client” head back to “My add-ons” then “PVR Clients” and run the add-on.
Now click on “Configure

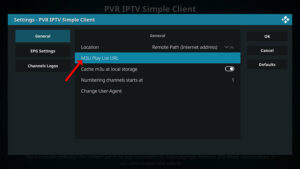
Step 8:  Now select “M3U Play List URL”.

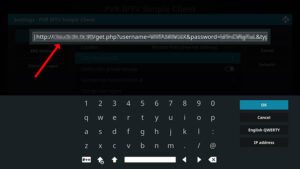
Step 9: Enter the M3U URL provided by your IPTV distributor and click “OK“.

Note: The progressive IPTV providers give you a dashboard in which you can generate your M3U URL in dashboard.

How to add EPG

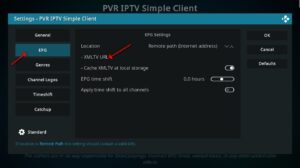
Step 10: Now go to “EPG Settings” and click on “XMLTV URL” for EPG. What is EPG?

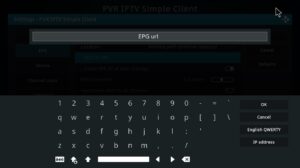
Step 11: Now paste your EPG URL and click “OK“.
You can get the EPG URL from your IPTV provider.

Step 12: Click on “Enable“.

Note: After you enable the add-on you will see “Disable”, this means the add-on is enabled so do NOT click on “Disable” again.

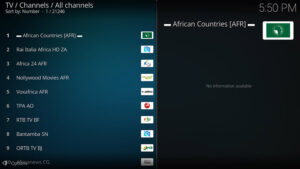
Step 13: Head back to “TV” and click on “Channels“.

Step 14: Wait until you see the notification about updating channels and the installation process is over.

Well done, you have IPTV channels now.

Once the IPTV add-on is configured, you should be able to access and stream IPTV channels through the add-on’s interface. The available channels will depend on your IPTV service provider or the source of your IPTV playlist.


Great Premium IPTV Subscription

Great IPTV is the best IPTV provider with more than 10,000 channels and more than 40,000 VOD on a private server using +10Gbps Network, we at Great Premium IPTV are looking forward to Helping All IPTV Users to enjoy their IPTV Subscription, we have the best Premium IPTV Subscription Which you can BUY Great IPTV Subscription From Here.
Kodi is an open-source media player software that allows you to organize and stream various forms of digital media, such as movies, TV shows, music, and photos, on different devices. It provides a user-friendly interface and supports a wide range of file formats.

You can use Kodi on most operating systems such as Android, Microsoft Windows, Linux, iOS, and devices such as Amazon FireTV, Smartphones, Apple TVXbox, and PC.

When people mention Kodi for IPTV, they are usually referring to using Kodi as a platform to access and stream IPTV services. Kodi has a feature called “PVR IPTV Simple Client” that allows you to integrate IPTV services into the Kodi interface. By configuring this client with the appropriate IPTV provider’s information, you can watch live TV channels, catch-up TV, and other IPTV content directly within Kodi.

Warning: Kodi Stalker is not an Official application for watching IPTV, Hackers use this application to steal IPTV line details.

How to setup IPTV Stalker on Kodi

IPTV Stalker is a popular IPTV add-on for Kodi that allows you to stream IPTV channels within the Kodi media player. However, it’s important to note that the use of IPTV Stalker may infringe upon copyright laws, and it may not be available or supported in all regions. With that said, here are general steps to set up IPTV Stalker on Kodi:

Step 1: Start by downloading Kodi based on your operating system: https://kodi.tv/download
In this case, we select “Windows“.

*Please note, here we guide how to set up IPTV in Kodi in Windows but the installation process is very similar in all operating systems.

Step 2: Select 64 Bit or 32 Bit based on your operating system.

Step 3: After installing and opening it, click on “Add-ons“.

Step 4: Now click on “Download” then select “PVR clients“.

Note: We are going to download and install the PVR add-on here, after installing no need to go to the “Download“.
You can find the installed add-ons “My add-ons

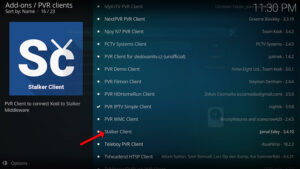
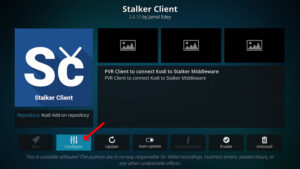
Step 5: Select “Stalker Client“.

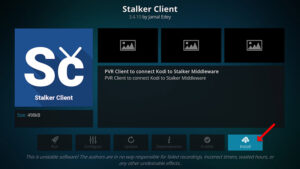
Step 6: Now click on “Install“.

Step 7: After installing “Stalker Client” head back to “My add-ons” then “PVR Clients” and run the add-on.
Now click on “Configure

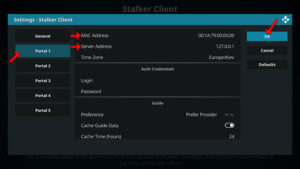
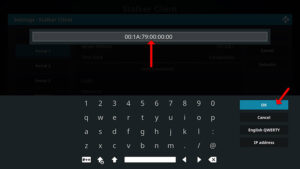
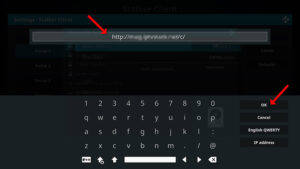
Step 8: Select Portal 1, and here add the Server address provided by your IPTV distributor and the Mac Address of the device. After entering the info accurately, select “OK

How to find the Mac address and link it to your account:

Part 1: Find your Mac address, This is a number of sorts that you are going to need to tie your device to your subscription. What is the MAC address in MAG devices?

  • Turn on your device and open Kodi.
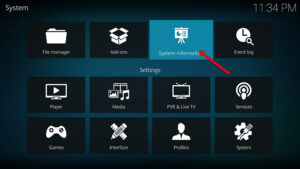
  • In the main menu select System and then System info.
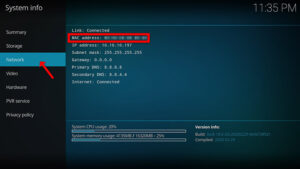
  • Select the network tab.
  • Write down the last 6 characters of your Mac address (For example: If your Mac address is ”2A:B3:35:03:E7:36 ″ then you should write down 03:E7:36)

Part 2: How to link your Mac address to your Subscription:

  • Login to your panel
  • Click on the Change IPTV Mac address button.
  • In the text field provided enter 00:1A:79: followed by the last six characters of your Mac address (For example 00:1A:79:03:E7:36)

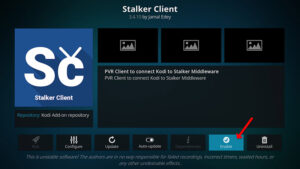
Step 9: Select “Enable“.

Note: After you enable the add-on you will see “Disable”, this means the add-on is enabled so do NOT click on “Disable” again.

Step 10: Head back to “TV” and click on “Channels“.

In this phase, it’s important that you restart your device to avoid errors. After restarting the TV section will appear, click on the TV.

Please note that the steps above are general guidelines, and the actual process may vary depending on the version of Kodi you’re using and any changes made to the IPTV Stalker add-on. Additionally, the legality and availability of IPTV Stalker may vary in different regions, so it’s important to use such add-ons responsibly and within the boundaries of the law.


Great Premium IPTV Subscription

Great IPTV is the best IPTV provider with more than 10,000 channels and more than 40,000 VOD on a private server using +10Gbps Network, we at Great Premium IPTV are looking forward to Helping All IPTV Users to enjoy their IPTV Subscription, we have the best Premium IPTV Subscription Which you can BUY Great IPTV Subscription From Here.
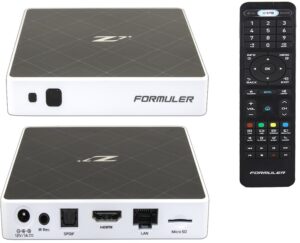
The Formuler Box is a multimedia streaming device that allows you to access and stream various types of content on your television. It is known for its compatibility with the MYTV Online app, which is a popular IPTV (Internet Protocol Television) application.

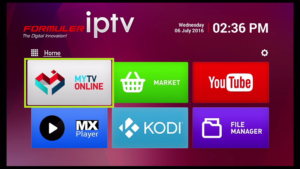
MYTV Online is specifically designed for Formuler devices and offers a user-friendly interface for watching live TV channels, video-on-demand content, and other multimedia services via IPTV. With MYTV Online, you can access IPTV services by connecting your Formuler box to the internet and logging into your IPTV provider’s account.

An important tip before starting the tutorial:

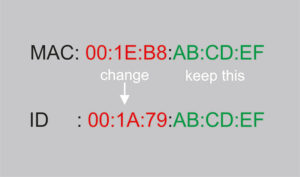
The FormulerZ Boxes have both Mac and ID, you can find the MAC address in the catalog of the device or in the back of the box.

It is a number like this MAC: 00:1E:B8:XX:XX: XX, to change it to box ID you need to replace 6 first digits and make it like this ID: 00:1A:79:XX:XX: XX.

How to bring IPTV channels to your FormulerZ

This tutorial can be used for all models of formula boxes including FormulerZ1 &  Formuler Z7+.

Step 1: Start by downloading the MyTVOnline app from the Google Play store and then open MYTV Online.


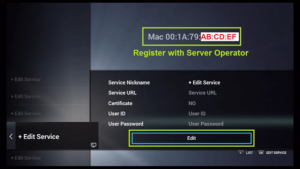
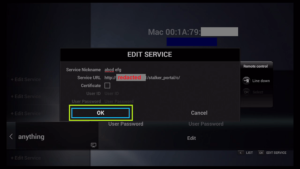
Step 2:  Now click on “Edit Service” and then click “Edit“.

Note: Be sure you register with your right ID Address (Do not use the MAC address). You can check important tips for more information.
Please note, this Mac address must be given to your IPTV provider.
Add the ID as MAG and use the MAG portal.

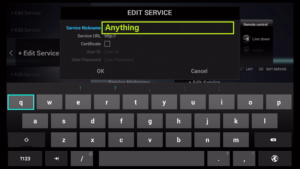
Step 3: Enter “Service Nickname” (Example: IPTVHELPCENTER) and click on “OK“.

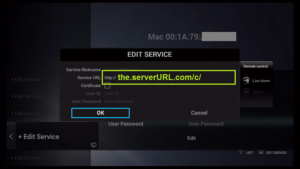
Step 4: Enter IPTV Server URL (STB MAG Emulator/ Portal URL) you get from your IPTV provider and click on “OK”. You can ask for a portal URL from your IPTV service provider.

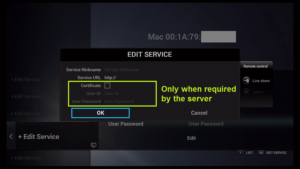
Step 5: Enter Username and Password is NOT necessary.

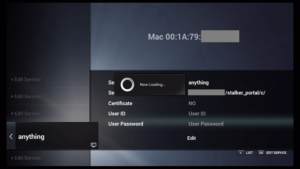
Step 6: Click on “OK” and proceed to the next step. Please note, this might take a little time.

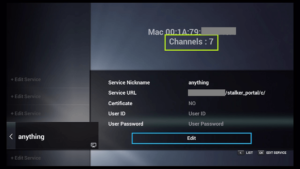
Step 7: Connecting to IPTV Server (with your registered data) is in progress now.

Step 8: Successful Connection! You receive all channels associated with your account.

Now Everything is ready and you can start watching Live TV.

It’s worth noting that the specific features, capabilities, and compatibility can vary depending on the model and version of the Formuler box you have, as well as any updates or changes made by the manufacturer. It’s always a good idea to refer to the official Formuler documentation and support channels for the most accurate and up-to-date information about their products.


Great Premium IPTV Subscription

Great IPTV is the best IPTV provider with more than 10,000 channels and more than 40,000 VOD on a private server using +10Gbps Network, we at Great Premium IPTV are looking forward to Helping All IPTV Users to enjoy their IPTV Subscription, we have the best Premium IPTV Subscription Which you can BUY Great IPTV Subscription From Here.

If you’re facing issues specifically with M3U URLs in IPTV services, here are some common problems and troubleshooting steps you can take:
What is the M3U URL?

M3U URL Troubleshoot

1 – First of all, you need to check if the M3U URL is correct or not.
Need to check the URL addressusername, and password.

The progressive IPTV providers give you a dashboard in which you can check your M3U url details in the dashboard.
Better to generate your M3U URL in the dashboard again to be sure everything is fine with it.

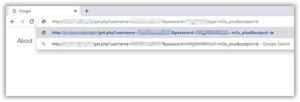
If you don’t have access to any dashboard system by your IPTV provider, you can test the M3U URL in a browser to check it.
Copy/Paste the M3U URL in a browser (in a PC or Smartphone), then press enter.
If the M3U file starts to download so it is correct, and if not you need to check M3U details with your IPTV provider.

Note: Also you need to check if the M3U URL is blocked by the IPTV provider or not. IPTV provider will block the line if you use it in more than the allowed devices at the same time.
(If you have a dashboard from your IPTV provider you can check this by running the diagnosis option for the URL)

2 – After becoming sure the M3U URL is correct, try to Reload the URL once again in your application.
Usually, this will solve the problem.

3 – In the next step if still have a problem, try to test the M3U URL in another device and application.

One of the best reference software is VLC on a computer.
How to set up VLC?
You have many other options too.
Other applications you can use.
For example, if you are facing trouble with the M3U url in Smart TV with Smart IPTV application.
You need to test it in VLC (Computer) or GSE (Smartphone), if the M3U url works in this software now you need to test the line in another application in your Smart TV e.g. Smart STB or SSIPTV application.
How to set up Smart STB?
How to set up SSIPTV?
If you see that the M3U url works fine in other applications so the problem is with the application you used.

4 – In the last step after checking everything need to contact the IPTV provider support to check the M3U URL.

Some helpful tips:

  • Always better to use the M3U URL and not use the Static M3U file to have all new updates.
  • Do not share your M3U url details in any public place.

Great Premium IPTV Subscription

Great IPTV is the best IPTV provider with more than 10,000 channels and more than 40,000 VOD on a private server using +10Gbps Network, we at Great Premium IPTV are looking forward to Helping All IPTV Users to enjoy their IPTV Subscription, we have the best Premium IPTV Subscription Which you can BUY Great IPTV Subscription From Here.
In the context of IPTV (Internet Protocol television), the term “Enigma Firmware Image” refers to the software image or file used to update the firmware of Enigma2-based IPTV receivers or set-top boxes.

It has an easy to use GUI (Graphical User Interface) which provides a lot of features including Auto-Bouquets, 7 Days EPG (Electronic Program Guide), Picons (Channel Icons).

Enigma2 is an open-source software framework that powers many IPTV receivers and set-top boxes. It provides a user interface and various features for accessing and streaming television content over IP networks. The firmware of these devices can be updated to add new features, improve performance, or fix issues.

An Enigma Firmware Image for IPTV typically contains the necessary software components, drivers, and configurations specific to a particular Enigma2-based receiver model. It is usually distributed by the manufacturer or the community that supports the device.

To update the firmware of an Enigma2-based IPTV receiver, you would typically download the Enigma Firmware Image file from a trusted source and then use the receiver’s software interface or a dedicated utility to install the new firmware onto the device. This process can vary depending on the specific receiver model and the instructions provided by the manufacturer.

Please note that the term “Enigma Firmware Image for IPTV” is specific to Enigma2-based receivers and does not have any direct relation to the original Enigma machine used during World War II.

How to add IPTV channels to Enigma2

Due to the lesser popularity among applications such as Kodi or Perfect Player, or, devices such a MAG and Android setup boxes, adding IPTV channels to Enigma2 was a little tricky in the past, however, with the appearance of xtream TV plugin on Enigma2 things get a lot simpler and you can install IPTV channels in just a matter of minutes.

In the context of IPTV and Enigma2-based receivers, here are some additional details:

  1. Enigma2-Based IPTV Receivers: Enigma2 is an open-source software framework primarily used in Linux-based set-top boxes and receivers for IPTV. These devices are designed to receive and decode television signals transmitted over IP networks.
  2. Firmware: Firmware refers to the software that is embedded in a device’s hardware and provides low-level control and functionality. It acts as the operating system for the device and controls its various components and features.
  3. Enigma Firmware Image: An Enigma Firmware Image for IPTV is a file that contains a complete firmware package for an Enigma2-based IPTV receiver. It includes the necessary software components, drivers, and configurations specific to a particular receiver model.
  4. Updating Firmware: Firmware updates are released by manufacturers to enhance device performance, add new features, address security vulnerabilities, or fix bugs. To update the firmware of an Enigma2-based IPTV receiver, you typically download the Enigma Firmware Image from a reliable source and install it onto the device using the provided software interface or utility.
  5. Community Support: Enigma2-based IPTV receivers often have a dedicated community of users and developers who provide support, create custom firmware images, and develop plugins and extensions to enhance the functionality of the devices. These communities often share firmware images and provide guidance on the installation and customization of the software.

It’s important to note that the specific steps and procedures for updating the firmware on an Enigma2-based receiver can vary depending on the manufacturer, model, and the software version being used. It is recommended to consult the manufacturer’s documentation or seek support from the community for accurate instructions pertaining to your specific device.


Great Premium IPTV Subscription

Great IPTV is the best IPTV provider with more than 10,000 channels and more than 40,000 VOD a private server using +10Gbps Network, we at Great Premium IPTV are looking forward to Help All IPTV Users to enjoy their IPTV Subscription, we have best Premium IPTV Subscription Which you can BUY Great IPTV Subscription From Here.
IPTV Smarters is a popular application used for streaming live TV channels, movies, TV shows, and other media content over the Internet. It is designed specifically for IPTV (Internet Protocol Television) services, which deliver television content through Internet Protocol (IP) networks.

website:
IPTV Smarters website

IPTV Smarters provides a user-friendly interface that allows users to access and enjoy IPTV services on various devices such as smartphones, tablets, smart TVs, and streaming boxes. The application supports different features, including live TV streaming, video on demand (VOD), electronic program guide (EPG), catch-up TV, and more.

With IPTV Smarters, users can typically connect to an IPTV service provider by entering their login credentials and server details. The application then fetches the available channels and content from the IPTV service provider and presents them in an organized manner, allowing users to navigate and watch their desired programs.

It’s important to note that IPTV Smarters itself is not an IPTV service but rather a client application that works in conjunction with IPTV service providers. Users need to subscribe to an IPTV service and obtain their login credentials to use the application effectively.

Please keep in mind that the availability and legality of IPTV services may vary by country, so it’s essential to ensure that you are using IPTV services and applications in compliance with the applicable laws and regulations in your region.

How to add IPTV channels to IPTV Smarters on Windows

Step 1: As we mentioned on top you can download IPTV Smarters directly from their website, here it’s the direct download URL:
https://www.iptvsmarters.com/#downloads

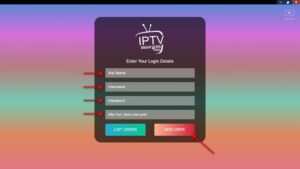
Step 2: After installing and launching the software, please try to “ADD NEW USER”.

Step 3: Now you need to enter login details. Select and enter “Any name” you want in the first blank. And fill Username, Password, and Server URL easily from the M3U URL.
The progressive IPTV providers give you a dashboard in which you can access your M3U URL in dashboard.
How to find Server Address, Username, and Password?

Click on ADD USER.

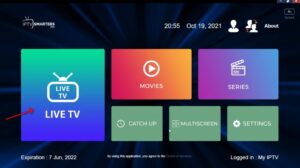
Step 4: After login, easily click on “LIVE TV”.

In this step, you can see the expiration date of your subscription at the bottom of the page.

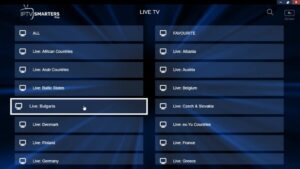
Step 4: Select the bouquet and Play the desirable channels.

IPTV Smarters features

IPTV Smarters offers a range of features that enhance the IPTV viewing experience. Here are some of its notable features:

  1. Live TV Streaming: IPTV Smarters allows users to stream live TV channels from their IPTV service provider. It supports various streaming protocols, including HTTP, HSL, M3U8, RTMP, and more.
  2. Video on Demand (VOD): The application enables users to access a library of on-demand content, such as movies, TV shows, and recorded programs. Users can search for specific titles or browse through categories to find their preferred content.
  3. Electronic Program Guide (EPG): IPTV Smarters integrates an EPG that provides a schedule of upcoming programs for each channel. Users can view program details, set reminders, and switch between different channels seamlessly.
  4. Catch-up TV: Some IPTV service providers offer catch-up TV functionality, allowing users to watch previously aired programs that they might have missed. IPTV Smarters supports catch-up TV features if provided by the IPTV service.
  5. Multi-Screen Support: The application is compatible with various devices, including smartphones, tablets, smart TVs, and streaming boxes. Users can enjoy IPTV services on multiple screens with a consistent user interface.
  6. Multi-Player Support: IPTV Smarters supports multiple players, including an internal player and external media players like MX Player, VLC, and others. Users can choose their preferred player for streaming content.
  7. Parental Controls: The application offers parental control features, allowing users to set restrictions on certain channels or content categories. This feature helps parents ensure that their children access appropriate content.
  8. Favorites and Playlists: Users can create personalized lists of favorite channels and organize them into playlists for quick and easy access.
  9. Multi-Language Support: IPTV Smarters supports multiple languages, making it accessible to users worldwide. The application interface can be displayed in different languages, and it can handle content with various audio tracks and subtitles.
  10. User Management: The application allows users to manage multiple IPTV subscriptions within the same interface. Users can add, edit, or remove multiple IPTV service providers and switch between them effortlessly.

These are some of the key features of IPTV Smarters. However, it’s important to note that the specific features and functionalities may vary depending on the IPTV service provider and the version of IPTV Smarters being used.


Great Premium IPTV Subscription

Great IPTV is the best IPTV provider with more than 10,000 channels and more than 40,000 VOD on a private server using +10Gbps Network, we at Great Premium IPTV are looking forward to Helping All IPTV Users to enjoy their IPTV Subscription, we have the best Premium IPTV Subscription Which you can BUY Great IPTV Subscription From Here.
STB stands for “Set-Top Box” in the context of IPTV (Internet Protocol Television). An STB is a device that enables the reception and display of television signals delivered over IP networks. It serves as a gateway between the IPTV service provider and the user’s television set.

An IPTV service delivers television content, such as live TV channels, video-on-demand (VOD) movies and shows, and interactive features, over an IP-based network, typically the Internet. The STB is connected to the user’s television set and an internet connection, allowing them to access and enjoy IPTV services on their TV.

The STB receives the IPTV signals from the service provider and decodes them into a format that can be displayed on the television. It typically includes features like an electronic program guide (EPG) for browsing and selecting channels, on-screen menus for navigating through content and settings, and sometimes even storage capabilities for recording programs.

STBs for IPTV come in various forms, including standalone devices that connect to the TV through HDMI or other video/audio outputs, as well as integrated solutions like smart TVs or streaming devices with built-in IPTV functionality. These devices provide an intuitive user interface and allow users to access a wide range of television content provided by IPTV service providers.

What is a setup box?

A “setup box” seems to be a term that might be confused or a typographical error. If you meant “set-top box” (STB), as discussed in the previous response, please refer to the explanation provided. However, if you are referring to a different term or concept, please provide more context or clarify your question so that I can assist you better.

the advantages of using STB

In the following, some of the most important advantages of STBs are explained.  A set-top box or recognized as STB is a device with a tuner in it that captures an external source of the signal and delivers to the television set a high-quality picture. The set-top box is required to maintain receiving the signals in the digital format.

STB stands for Set-up Box is a device that turns the input signals into the ones that can be displayed on a TV screen or other devices. STBs also called Set-up Units (STU) are common tools to watch IPTV, cable TV, and satellite TV.

Features of setup boxes

  1. Channel reception: STBs allow users to receive and decode television signals, enabling them to access a variety of channels, including live TV broadcasts.
  2. Video-on-demand (VOD): Many modern STBs offer access to video-on-demand services, allowing users to stream movies, TV shows, and other content directly to their television.
  3. Recording capabilities: Some STBs have built-in storage or support for external storage devices, allowing users to record their favorite shows and movies for later viewing.
  4. Electronic program guide (EPG): STBs often include an electronic program guide that displays information about current and upcoming programs, making it easier for users to navigate and select the content they want to watch. What is EPG?
  5. Internet connectivity: Many STBs provide internet connectivity, either through built-in Wi-Fi or Ethernet ports, allowing users to access online streaming services, browse the web, or use various interactive features.
  6. App support: Some advanced STBs offer support for apps, allowing users to access popular streaming services, social media platforms, games, and other applications directly on their TV.
  7. High-definition (HD) and 4K support: STBs are designed to deliver high-quality video content, supporting resolutions up to full HD (1080p) or even 4K Ultra HD, depending on the model and capabilities.
  8. Audio output options: STBs typically offer various audio output options, including HDMI, optical audio, and analog audio, allowing users to connect their setup box to different types of audio equipment, such as home theater systems or soundbars.
  9. Parental controls: Many STBs include parental control features, enabling users to restrict access to certain channels or content based on age ratings, ensuring a safer viewing experience for children.
  10. Interactive features: Depending on the service provider and STB model, setup boxes can offer interactive features such as on-screen chat, voting, quizzes, and interactive advertisements.

It’s worth noting that the specific features and capabilities of setup boxes can vary depending on the manufacturer, model, and IPTV service provider.

Before purchasing a setup box, let’s ask a few questions and examine a few aspects of a setup box to make the best choice.

  1. Is the manufacturer providing only one option or a variety of options?
  2. For High Definition content, does the manufacturer support HD quality with this device?
  3. Check the warranty, does the manufacturer supply any warranty on the set-top box?
  4. Customer service, Does the manufacturer provide decent customer satisfaction?
  5. Selection of the channel, does the IPTV service provider provide channels of your favorite?
  6. Selection of packages and exclusive privileges granted or not?
  7. It is worth for money, are you paying for the device which you want?
  8. Payment service, call, and online payment?
  9. Added TV channels, interactive games, and channels for all family members?
  10. Video-on-demand service is given or not which gives you access to extensive libraries, live concerts, and TV shows. What is Video On Demand (VOD)?

Now we will see the advantages and disadvantages of the set-top box.

Advantages

Below is a short demonstration of the advantages that setup boxes offer.

  • The quantity of channels extends to a great amount.
  • A large enhancement in picture quality when utilizing the set-top box.
  • All kinds of troubles in watching channels will be reduced.
  • IPTV providers will be able to offer HD quality which is one of the most important uses of the set-top box.
  • The big switch on the small screen with the use of a set-top box. It will bring on the digital revolution.

Disadvantages

  • Free-to-air channels will also not be available without the set-top box.
  • It will be mandatory to have the set-top box and this will add an extra expense.

Great Premium IPTV Subscription

Great IPTV is the best IPTV provider with more than 10,000 channels and more than 40,000 VOD on a private server using +10Gbps Network, we at Great Premium IPTV are looking forward to Helping All IPTV Users to enjoy their IPTV Subscription, we have the best Premium IPTV Subscription Which you can BUY Great IPTV Subscription From Here.
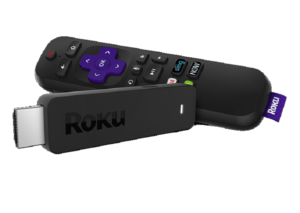
Roku is a popular brand and platform for streaming media devices. It offers a range of products that allow users to stream digital content, such as movies, TV shows, music, and games, directly to their television sets. The Roku devices connect to the internet and provide access to various streaming services, including popular ones like Netflix, Hulu, Amazon Prime Video, and Disney+. How to use the IPTV service on Roku?

Roku devices are known for their simplicity and user-friendly interface. They typically come in the form of small set-top boxes or streaming sticks that can be connected to a TV’s HDMI port. Once connected, users can navigate through the Roku interface using a remote control or the Roku mobile app.
One of the advantages of Roku is its extensive content library, which includes both free and paid streaming channels. It provides access to a wide range of entertainment options, allowing users to personalize their streaming experience. Additionally, Roku supports various resolutions, including 4K Ultra HD and HDR (High Dynamic Range), depending on the specific model.

Besides its hardware devices, Roku also licenses its operating system, called Roku OS, to TV manufacturers. This integration allows some smart TVs to have Roku functionality built directly into them.

Overall, Roku has become a popular choice for people looking to enhance their TV viewing experience by streaming content from various online platforms in a convenient and user-friendly manner. How to use the IPTV service on Roku?

How to set up Roku

Setting up a Roku device is a relatively straightforward process. All Roku players attach to your TV by HDMI. Roku Express+ combines the option to connect via a composite cable that operates with older TVs.

Discover your Roku type

There are two central types of Roku, both of which will need your TV to have at least one HDMI port.

  • Roku Player — This is a setup box that appears with several cables.
  • Roku Stick — Mirrors a flash drive that comes with at least one power cable.

Connect the Roku to your TV’s HDMI port

All HDTVs have at least one HDMI port; the HDMI port can often be located on the back of the TV. Based on your Roku type, this process will diversify lightly.

  • Roku Player — Plug one end of the HDMI cable into the back side of the Roku Player’s box, then plug the other end into the HDMI port on the back or side of your TV.
  • Roku Stick — Plug the HDMI connector on the end of your Roku Stick into the HDMI port on the back or side of your TV.
  • Most HDTVs have more than one HDMI port.
  • If your TV doesn’t have an HDMI port, you cannot use a Roku Stick with your TV.
  • Note the HDMI port’s number. On TVs that have more than one HDMI port, you’ll see a number next to the port into which you connected the Roku.

Attach the Roku to a power source

Both the Roku Player and the Roku Stick need a connection to a power source or a power outlet.

  • Roku Player — Plug one end of the included power cable into the back of the player box, then plug the other end into an electrical outlet.
  • Streaming Stick (model 3800 and down) Plug one end of the included power cable into the back of the stick, then plug the other end into an electrical outlet.
  • Streaming Stick+ (model 3810) — Plug one end of the included power cable into the side of the stick, then plug the other end into an electrical outlet.

Please note, if your TV has a USB port, you can use that to connect a Roku stick and it works as a power source.

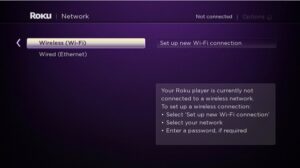
Connect to the internet

On the network section, perform the following steps:

  • Scan for networks by selecting Scan again to see all networks and select “OK
  • Search through the available Wi-Fi networks till you find your network SSID.
  • Choose the network by highlighting it and pressing “OK
  • Enter the password for the network by using the on-screen keyboard.
  • Press “OK” when indicated.

After connecting to a network, you must allow Roku to get the latest update.

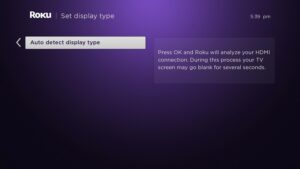
Verify the display settings

If you’re utilizing a Roku player, your Roku will quickly discover the suitable settings for your HDTV and apply them.

  • For a Roku Streaming Stick, you’ll choose Set display type and leave the setup to run.
  • On a Roku Streaming Stick+, you’ll choose Auto to identify display type alternatively.
  • You can edit the display settings once your Roku is set up by opening Settings at a later time.

Activating Your Roku

You’ll require to insert the five-character code which appears on-screen in order to activate your Roku device.

  • Go to https://my.roku.com/link
  • You can additionally perform this process in a smartphone browser.
  • In the text box in the center of the page, insert the five-character code.
  • Now click on submit.
  • Enter the on-screen text fields with your email address, password, and other necessary information.

This was the last step in setting up your Roku device for streaming IPTV channels. In order to use IPTV features on Roku, you can use the M3U playlist player application on your device. Setup a ROKU IPTV using the Web video caster

Watch Free Channels on Roku

Watching free channels such as FoxHistory, etc. even in 4K quality is of the preferred features of Roku. By clicking on “Top Free Channels” you can find all the free content that will come to your TV by buying a Roku device. Youtube is placed on top of this list.

That’s it! Once you’ve completed these steps, your Roku device is set up and ready to stream content. You can start exploring the available channels, streaming services, and other features offered by Roku.


Great Premium IPTV Subscription

Great IPTV is the best IPTV provider with more than 10,000 channels and more than 40,000 VOD on a private server using +10Gbps Network, we at Great Premium IPTV are looking forward to Helping All IPTV Users to enjoy their IPTV Subscription, we have the best Premium IPTV Subscription Which you can BUY Great IPTV Subscription From Here.