Month: September 2023

Dreamlink boxes are a popular choice for IPTV enthusiasts, and one of the most efficient ways to set up IPTV on a Dreamlink box is through DOL2 (DreamOnline 2). In this comprehensive guide, we will walk you through the process of setting up IPTV on your Dreamlink box using DOL2. What is the Software you need for watching IPTV?

Introduction to IPTV and Dreamlink Box

IPTV is a technology that enables the delivery of television content through Internet Protocol (IP) networks. Unlike traditional cable or satellite TV, IPTV offers more flexibility and a wider selection of channels. Dreamlink boxes are known for their compatibility with IPTV services, making them an excellent choice for those who want to enjoy high-quality entertainment. How to set up IPTV on Dreamlink?

What is DOL2?

DOL2, short for DreamOnline 2, is the interface through which you can access and manage your IPTV channels on your Dreamlink box. It provides a user-friendly platform for setting up and customizing your IPTV experience.

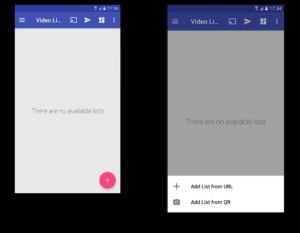
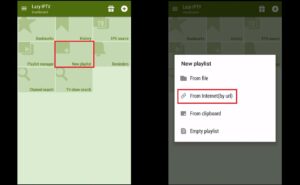
How to add IPTV channels to Dreamlink

To add channels to your dreamlink device, follow the below steps.

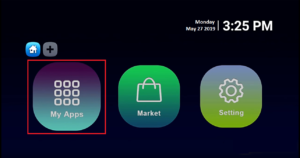
Step 1: From the main page, go to “My Apps“.

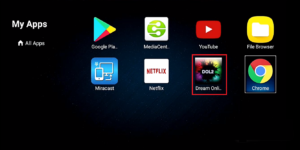
Step 2: Select DreamOnline (DOL 2).
Note, If the DreamOnline (DOL2) app is not in the My Apps folder go to the Market folder, find DreamOnline (DOL2), and install it. After that, it will appear in the My Apps folder/

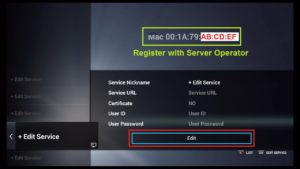
Step 3: Now select “Edit Service” and then click on “Click Edit“.
Important: Be sure you register on (Server Operator Homepage) with your right MAC Address (if necessary). What is MAC address in Enigma2 for watch IPTV? 

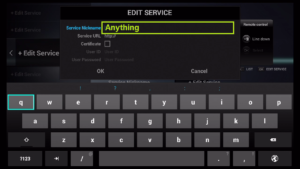
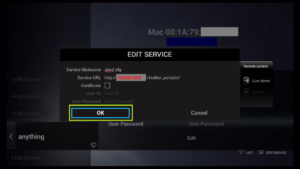
Step 4: Enter the Service Nickname (Any name).

Step 5: Enter the IPTV Server URL (Portal URL) you get from your Server Operator.

Step 6: It is NOT necessary to enter the Username and Password.
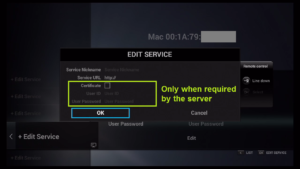
Step 7: Click “OK“.

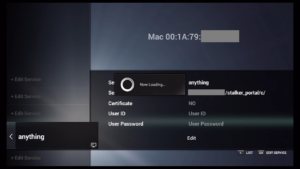
Step 8: Connecting to the IPTV Server (with your registered data) is in progress.

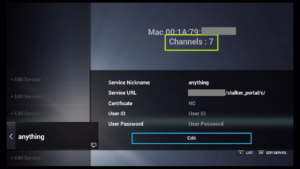
Step 9: Successful Connection! You receive all channels associated with your account.

Troubleshooting Common Issues

If you encounter any issues during setup or while using DOL2, refer to our troubleshooting guide in the next section for solutions to common problems.

Benefits of Using DOL2 for IPTV

DOL2 offers several advantages for IPTV enthusiasts:

  • User-friendly interface
  • Customizable settings
  • Access to a wide range of channels
  • EPG support for program schedules
  • Regular updates for improved performance

Tips for a Smooth IPTV Experience on Dreamlink

To enhance your IPTV experience, consider the following tips:

  • Use a wired Ethernet connection for better stability.
  • Keep your Dreamlink box and router up to date with the latest firmware.
  • Use a VPN for added security and privacy.
  • Explore the customization options in DOL2 to tailor your IPTV experience.

Security Concerns and Best Practices

While enjoying IPTV on your Dreamlink box, it’s essential to be mindful of security. Avoid sharing your login credentials and only use trusted IPTV providers to prevent potential security risks.

Conclusion

Setting up IPTV on your Dreamlink box via DOL2 is a straightforward process that opens up a world of entertainment options. With the right configuration and precautions, you can enjoy a seamless IPTV experience tailored to your preferences.

FAQs

  1. Is IPTV legal?
    • IPTV itself is legal, but the legality of specific content and sources can vary by region. Always use legitimate IPTV services to stay within the law.
  2. Can I use a VPN with my Dreamlink box for added security?
    • Yes, using a VPN with your Dreamlink box can enhance your online security and privacy.
  3. Do I need a high-speed internet connection for IPTV?
    • While a high-speed connection is recommended for the best experience, IPTV can work with various internet speeds.
  4. What should I do if my IPTV channels are buffering?
    • Check your internet connection and ensure it’s stable. You can also adjust the video quality settings in DOL2 for smoother playback.
  5. Can I record IPTV content on my Dreamlink box?
    • Some Dreamlink models offer recording functionality, but it depends on the specific model and IPTV service you’re using.

Now that you have a comprehensive guide on setting up IPTV on your Dreamlink box via DOL2, you can enjoy a wide variety of entertainment options at your fingertips. Remember to follow the provided tips and security best practices to make the most of your IPTV experience while staying safe online.


Great Premium IPTV Subscription

Great IPTV is the best IPTV provider with more than 10,000 channels and more than 40,000 VOD on a private server using a +10Gbps Network, Great IPTV at Great Premium IPTV is looking forward to Helping All IPTV Users to enjoy their IPTV Subscription, Great IPTV the best Premium IPTV Subscription Which you can BUY Great IPTV Subscription From Here.

Wiseplay, a versatile multimedia player, supports IPTV and offers a user-friendly interface, making it a preferred choice for many. Let’s delve into the setup process.

Getting Started with Wiseplay

Before diving into the IPTV setup, you need to install Wiseplay on your device. You can find it on the respective app store for your platform, whether it’s iOS, Android, or another operating system.

You can download this app via the link below:
https://play.google.com/store/apps/details?id=com.wiseplay&hl=en_US

Gathering IPTV Service Details

To set up IPTV on Wiseplay, you’ll require specific information from your IPTV service provider. This includes the IPTV playlist URL, username, and password. Ensure you have these details handy before proceeding. How to find Server Address in M3U Url?

How to add a list from a URL

Step 1: To add a playlist using an M3U URL, select the pink circle at the bottom right corner of your screen select “Add List from URL” and paste your M3U URL“.

Step 2: After importing your M3U URL,  select your added playlist. What is the M3U list?

Step 3: Here you can select the channels based on each group.

Troubleshooting Common Issues

Encountering issues with your IPTV setup? Don’t worry; we’ve got you covered. This section will address common problems and provide solutions to ensure smooth streaming.

Streaming IPTV on Wiseplay

With your IPTV playlist added and settings configured, you’re now ready to start streaming your favorite channels and content.

Best Practices for an Optimal Experience

To make the most of your IPTV setup, consider some best practices, including using a high-speed internet connection, keeping your device updated, and using a VPN for added security.

Security and Safety Considerations

As with any online activity, it’s essential to prioritize your security and safety when using IPTV services. We’ll discuss some crucial considerations in this section.

Features of Wiseplay

  1. Wide Format Support: Wiseplay supports a wide range of multimedia formats, making it versatile for playing various types of audio and video files.
  2. IPTV Support: One of the standout features of Wiseplay is its support for IPTV. You can stream live television content over the internet using this app, provided you have the necessary IPTV playlist.
  3. User-Friendly Interface: Wiseplay boasts an intuitive and user-friendly interface, making it easy for users to navigate through their media library and playlists.
  4. Playlist Management: Users can organize and manage their playlists efficiently, allowing them to group their favorite channels and content for quick access.
  5. Customizable Settings: Wiseplay offers a range of customizable settings, including video and audio preferences, subtitle options, and even interface themes, allowing users to personalize their viewing experience.
  6. Chromecast Support: Wiseplay supports Chromecast, enabling users to cast their media to larger screens for a better viewing experience.
  7. Parental Controls: For added security, Wiseplay includes parental control features, allowing users to restrict access to certain content.
  8. Multi-Language Subtitles: The app supports multi-language subtitles, ensuring that users can enjoy content in their preferred language.
  9. Background Playback: Wiseplay allows for background playback, meaning you can continue listening to audio content even when the app is minimized or your device is locked.
  10. Regular Updates: The Wiseplay team frequently updates the app to improve performance and add new features, ensuring a seamless user experience.
  11. Free and Premium Versions: Wiseplay offers both free and premium versions. The free version includes basic features, while the premium version unlocks additional functionalities and removes ads.
  12. Cross-Platform Compatibility: Wiseplay is available on various platforms, including iOS, Android, and Smart TVs, making it accessible to a wide range of users.
  13. Community and Support: Users can find support and connect with other Wiseplay enthusiasts through online forums and communities dedicated to the app.

These features collectively make Wiseplay a popular choice for those looking to enjoy multimedia content, especially IPTV, on their devices. Its user-friendly interface and extensive format support make it a valuable addition to any media consumption toolkit.

Frequently Asked Questions (FAQs)

  1. Is Wiseplay available for free?
    • Yes, Wiseplay offers a free version with limited features, but you can upgrade to the premium version for an enhanced experience.
  2. Can I use Wiseplay on my Smart TV?
    • Yes, Wiseplay is compatible with Smart TVs. You can download it from the app store on your TV.
  3. Do I need a VPN for IPTV?
    • While it’s not mandatory, a VPN can enhance your privacy and security while streaming IPTV content.
  4. What should I do if my channels buffer frequently?
    • Ensure you have a stable internet connection, and consider lowering the video quality in Wiseplay’s settings.
  5. Can I record IPTV content using Wiseplay?
    • Wiseplay doesn’t offer built-in recording functionality, but you can explore third-party options for this purpose.

Conclusion

Setting up IPTV on Wiseplay opens up a world of entertainment possibilities. With the right information and configuration, you can enjoy your favorite TV shows, movies, and live events seamlessly. Remember to stay safe and enjoy your IPTV experience!


Great Premium IPTV Subscription

Great IPTV is the best IPTV provider with more than 10,000 channels and more than 40,000 VOD on a private server using a +10Gbps Network, Great IPTV at Great Premium IPTV is looking forward to Helping All IPTV Users to enjoy their IPTV Subscription, Great IPTV the best Premium IPTV Subscription Which you can BUY Great IPTV Subscription From Here.

In this comprehensive guide, we will walk you through the process of setting up IPTV on Lazy IPTV, a popular IPTV player for Android devices. IPTV, or Internet Protocol Television, allows you to stream live TV channels and on-demand content over the Internet. Lazy IPTV is known for its user-friendly interface and flexibility, making it a preferred choice for many IPTV enthusiasts. Whether you’re a beginner or an experienced user, follow our step-by-step instructions to enjoy your favorite TV shows and movies hassle-free.

What is Lazy IPTV?

Lazy IPTV is a user-friendly application designed for IPTV enthusiasts who want to enjoy their favorite television content on their Android devices. It offers a seamless way to watch live TV, movies, and series, and an internet connection. Lazy IPTV stands out for its simplicity and customization options, making it an excellent choice for both beginners and experienced IPTV users.

You can download this app via the link below:

https://play.google.com/store/apps/details?id=com.lazycatsoftware.iptv&hl=en_US

How to add IPTV channels to Lazy IPTV

Step 1: To add your M3U URL, start by clicking on “New Playlist” and then select “From Internet(by URL)”.

 Step 2: Here you must give a name to your playlist inside “playlist’s name” Paste your M3U link inside the “path to playlist file or url” and click on save.

Step 3: Your playlist should be added now. You can select a group and select a channel to start your TV session.

Features of Lazy IPTV

  1. User-Friendly Interface: Lazy IPTV boasts an intuitive and easy-to-navigate interface, making it accessible to users of all technical levels.
  2. Custom Playlist Management: Users can create and manage their custom playlists, allowing for a tailored IPTV experience with favorite channels and content.
  3. EPG Support: Electronic Program Guide (EPG) integration provides users with program schedules, making it easier to browse and select content. What is EPG And what are its features?
  4. Time-Shift Functionality: Lazy IPTV enables time-shifted viewing, allowing users to pause, rewind, or fast forward live TV, providing greater control over their viewing experience.
  5. Recording Capabilities: Users can record live television shows and movies, ensuring they never miss their favorite programs.
  6. Multiple Device Support: Lazy IPTV can be used on various platforms, including Android devices, providing flexibility for users with multiple devices.
  7. Customization Options: The application offers numerous customization options, such as changing the app’s appearance, arranging channel orders, and more.
  8. Parental Control: For added security and content filtering, Lazy IPTV includes parental control features, allowing parents to restrict access to certain content based on age appropriateness.
  9. Smooth Playback: Lazy IPTV is designed for reliable and uninterrupted streaming, ensuring a smooth viewing experience.
  10. Compatibility: Lazy IPTV is compatible with a wide range of Android devices, making it accessible to a broad user base.

These features collectively make Lazy IPTV a popular choice among IPTV enthusiasts, offering a versatile and enjoyable way to access and customize television content over the internet.

Frequently Asked Questions (FAQs)

What is IPTV?

IPTV, or Internet Protocol Television, is a technology that delivers television content over the Internet, offering a more flexible and customizable viewing experience compared to traditional cable or satellite TV.

Is Lazy IPTV compatible with Android devices?

Yes, Lazy IPTV is compatible with Android devices, making it accessible to a wide range of users.

Can I record shows on Lazy IPTV?

Absolutely! Lazy IPTV allows you to record live TV shows and movies, giving you the flexibility to watch them at your convenience.

How do I update Lazy IPTV?

You can update Lazy IPTV by visiting the Google Play Store and checking for app updates. Make sure to keep your app up to date for the best experience.

Is Lazy IPTV legal?

Lazy IPTV itself is a legal application. However, the legality of the content you access through IPTV services may vary by region and licensing agreements. Ensure you are using Lazy IPTV to access legal and licensed content.

Conclusion

Lazy IPTV is a versatile and user-friendly application that simplifies the IPTV experience. With its customization options, EPG integration, and time-shift capabilities, Lazy IPTV offers a comprehensive solution for anyone looking to enjoy IPTV on their Android device. Download Lazy IPTV today and unlock a world of entertainment at your fingertips.


Great Premium IPTV Subscription

Great IPTV is the best IPTV provider with more than 10,000 channels and more than 40,000 VOD on a private server using a +10Gbps Network, Great IPTV at Great Premium IPTV is looking forward to Helping All IPTV Users to enjoy their IPTV Subscription, Great IPTV the best Premium IPTV Subscription Which you can BUY Great IPTV Subscription From Here.

In today’s digital age, IPTV (Internet Protocol Television) has become increasingly popular as a convenient way to access and enjoy a wide range of television content. Whether you want to record your favorite shows, sports events, or movies on your iOS device, this article will guide you through recording IPTV in iOS via screen capture. By the end of this article, you’ll have the knowledge and tools to capture and save your favorite IPTV content for offline viewing. What is IPTV?

 Introduction

IPTV has revolutionized the way we consume television content. However, there are times when you may want to record your favorite shows, sports events, or movies to watch later. This article will walk you through recording IPTV on your iOS device using screen capture methods.

Understanding IPTV

Before we delve into the recording process, let’s briefly understand what IPTV is. IPTV is a technology that delivers television content over the internet, allowing users to stream live TV, on-demand videos, and more. It’s a flexible and convenient way to access a vast array of content.

Why Record IPTV in iOS?

Recording IPTV content in iOS can be beneficial for several reasons. You can save content for offline viewing, create a personal library of your favorite shows, or capture memorable moments from live broadcasts. Whether it’s for convenience or archiving purposes, recording IPTV can enhance your entertainment experience.

Preparation and Tools

Before you start recording IPTV on your iOS device, you’ll need the following:

1. iOS Device

Ensure you have an iOS device, such as an iPhone or iPad, with the latest operating system installed. GSE IPTV for IOS and Apple TV

2. IPTV App

Download and install a reputable IPTV app from the App Store. Make sure it’s compatible with your iOS version. How to setup Plex on Apple TV? 

3. Screen Recording Software

Your iOS device comes with built-in screen recording functionality. Familiarize yourself with this feature, as it will be essential for capturing IPTV content.

Record your MacBook’s screen

To get started recording your Mac’s screen, open QuickTime Player. Go to File > New Screen Recording. The Screen Recording window will resemble.

Click the downwards-facing arrow next to the record button and you’ll notice configuration options. To add a voiceover, select a Microphone source. If you’d like the recorded video to show mouse clicks (which are displayed as a thick black circle around the pointer), turn that option on.

Click the big record button. You can now click again to start recording or drag an area to record only that part of the screen. In the latter case, click Start Recording when happy with your selection.

Once you’re done recording, click the record button in the menu bar. Your movie will open inside QuickTime Player.

Save, trim, and export your video

After viewing your movie, you may need to edit it. Before doing so, go to File > Save and save a copy of the whole recording. Then, go to Edit > Trim (Command+T). Use the yellow drag handles to set new start and end points for your video. (For full-screen video recordings, you’ll especially want to remove the bit at the end where your cursor moves to the menu bar to stop the recording.)

If positive you’ll never need the cut footage, go to File > Save (Command+S) to overwrite the original file; alternatively, multiply your clip (File > Duplicate) and save the copy.

Long movies and/or those from a high-resolution screen may be quite big. You can optionally use Export As… to save versions of your movie in formats with a lower resolution (useful if emailing them). Notwithstanding, if you’re uploading to YouTube, don’t decrease the quality of your footage beforehand, because the site will do that for you. The same goes for sharing them through iCloud.

Record your Apple TV’s screen

Recording video from an Apple TV isn’t completely easy. Your Apple TV must still be outputting content via HDMI – both to television or by managing a headless display emulator.

To record an Apple TV, you’ll additionally be required to connect it to your Mac. The fourth-generation model can be attached using a USB-C cable. The Apple TV 4K lacks a USB-C port, and so you’ll need to match your Apple TV and Mac, which must be on the related Wi-Fi network.

How you go about this depends on what version of macOS you’re running. On macOS Sierra, use Xcode (free on the Mac App Store) to match the devices. Go to Window >Devices and Simulators. On the Apple TV 4K, open the Settings app and go to Remotes and Devices > Remote App and Devices. In Xcode, select your Apple TV and enter the pin that appears on the Apple TV. The devices should now be joined.

In QuickTime Player, go to File > New Movie Recording. Click the downwards-facing arrow next to the record button select your Apple TV from the Camera and Microphone options, and then choose a quality setting (High or Maximum).

If you’re using macOS Sierra, your paired Apple TV should be mirrored within QuickTime Player at this point, and you can start recording. On macOS High Sierra, you’ll when choosing your Apple TV from the Camera options be asked to enter a code from the Apple TV on your Mac, and then acknowledge the screen recording on the Apple TV. (Also: a red box appears around the Apple TV’s screen when recording’s happening, but this does not become part of your movie.)

Record an iPhone or iPad’s screen

Recording an iPhone or iPad’s screen can be done easily using the built-in screen recording feature that Apple provides on iOS. Here’s how you can do it:

As of iOS 11, an iPhone or iPad can record its own screen without additional software. In the Settings app, go to Control Center > Customize Controls. Tap the + next to Screen Recording.

When you next bring up Control Center by swiping from the bottom of the screen, you’ll see the screen recording button. Tap it and you’ll get a three-second countdown before the recording begins. When you’re done, tap the red bar at the top of the screen and then Stop, or press the button in Control Center a second time. Your video will be saved to Photos.

With an iPhone or iPad running iOS 10, connect your device via USB to your Mac. Then use the same process in QuickTime Player as when recording an Apple TV.

Note:

  • You can also record audio along with the screen by long-pressing the screen recording button in the Control Center and toggling on the microphone.
  • While recording, be mindful of any sensitive information on your screen, as everything will be captured.
  • Some apps, like Netflix and certain banking apps, may restrict screen recording for content protection reasons.

This built-in screen recording feature should work for most purposes, but if you need more advanced features like editing, you can transfer the recording to a computer and use video editing software for further customization.

FAQs

1. Can I record IPTV content legally?

Yes, but make sure you have the necessary rights to do so. Recording copyrighted material without permission may infringe on copyright laws.

2. What if my screen recording has poor quality?

Adjust the recording settings in your Control Center to improve quality, and ensure you have sufficient storage space.

3. Is there a time limit for screen recording on iOS?

Screen recordings can typically last up to 10 minutes, but you can start a new recording if needed.

4. How much storage space do I need for recordings?

The amount of storage space required depends on the length and quality of your recordings. Make sure you have enough free space on your device.

5. Can I record live IPTV broadcasts?

Yes, you can use screen recording to capture live IPTV broadcasts for later viewing.

Conclusion

Recording IPTV content on your iOS device is a convenient way to enjoy your favorite shows on your own schedule. By following the steps outlined in this article, you can create a library of IPTV content and enhance your entertainment experience.


Great Premium IPTV Subscription

Great IPTV is the best IPTV provider with more than 10,000 channels and more than 40,000 VOD on a private server using a +10Gbps Network, Great IPTV at Great Premium IPTV is looking forward to Helping All IPTV Users to enjoy their IPTV Subscription, Great IPTV the best Premium IPTV Subscription Which you can BUY Great IPTV Subscription From Here.

What is Openbox?

Openbox is a popular brand of digital satellite receivers known for their versatility and compatibility with various types of content delivery systems. These receivers provide access to a wide range of digital and satellite channels. Setting up IPTV on an Openbox receiver allows you to expand your channel options even further.

Understanding IPTV

IPTV stands for Internet Protocol Television, a technology that delivers television content over the Internet rather than traditional cable or satellite methods. With IPTV, you can access a vast array of channels and on-demand content, making it a flexible and cost-effective choice for entertainment.

Prerequisites

Before diving into the setup process, ensure you have the following:

  • An Openbox receiver (compatible with IPTV)
  • Stable internet connection
  • IPTV subscription details (username, password, and portal URL)
  • Remote control for your Openbox

Setting Up IPTV on Openbox

Connect Your Openbox Receiver

Start by connecting your Openbox receiver to your TV and a power source. Ensure everything is properly connected and powered on.

Access the Portal Settings

  1. Turn on your Openbox receiver.
  2. Using your remote control, navigate to the “Settings” or “System Settings” menu.
  3. Look for an option related to “Portals” or “IPTV Settings” and select it.

Enter Your IPTV Subscription Details

  1. In the Portal Settings, you’ll need to enter your IPTV subscription information.
  2. Input your username, password, and the portal URL provided by your IPTV service provider.
  3. Double-check the information for accuracy.

Save and Restart

After entering the details, save your settings and restart your Openbox receiver. This step ensures that your receiver connects to the IPTV server.

Adding IPTV Channels to Openbox

Step 1: Follow these tasks:
1-Connect the USB containing the Web.m3u file
2-Open Menu
3-Move right all the way to “Multimedia
4-From the list choose “WebTV

Step 2: If there are channels already on that list, make sure that they are empty by pressing the green button: Del All. Now press the yellow button to “Read By USB” and then the channels will appear.

Step 3: If you don’t have the yellow option ” Read by USB”, go back to the main menu and select “Tools”.

Step 4: Now select “Upgrade By USB”.

Step 5: On the next page, change Upgrade Mode to “Misc Files” and from the bottom of the list choose “Select & Upgrade”. Now press OK on it.

Step 6: From the window that pops up, select “WebTV.m3u (Web Stream)” and you must make sure a green tick appears on the right side. Afterward, press the yellow button to Upgrade.

After the process is done, you will see a message saying “Upgrade Finished. Press Info Key for Result”. Now press exit twice to head back to the main menu and from Multimedia open the WebTV app and the channels will appear on the list.

The features of Openbox

Openbox is a highly configurable and lightweight window manager for X11-based desktop environments, primarily used in Linux. It’s known for its minimalistic approach, allowing users to customize and extend it to suit their needs. Here are some of the key features of Openbox:

  1. Lightweight: Openbox is extremely lightweight and consumes very little system resources, making it ideal for older or less powerful hardware.
  2. Customizable: Users can easily customize Openbox by editing plain text configuration files. This allows you to define keybindings, set window decorations, configure menu entries, and more to tailor your desktop environment to your preferences.
  3. Virtual Desktops: Openbox supports multiple virtual desktops, allowing you to organize your workspace efficiently and switch between different tasks easily.
  4. Tiling and Stacking: Openbox supports both stacking and tiling window management styles, giving you the flexibility to choose how your windows are managed.
  5. EWMH and ICCCM Compliance: Openbox adheres to Extended Window Manager Hints (EWMH) and Inter-Client Communication Conventions Manual (ICCCM) standards, ensuring compatibility with a wide range of applications and window manager utilities.
  6. Application Docking: Openbox provides a simple docking system, allowing you to create and customize application docks or panels. Popular panels like tint2 and lxpanel can be used with Openbox for this purpose.
  7. Window Cycling: You can cycle through open windows with keyboard shortcuts, making it easy to switch between applications quickly.
  8. Focus Management: Openbox offers multiple focus modes, including click-to-focus and focus-follows-mouse, giving you control over how windows gain focus.
  9. Fullscreen and Maximization: Openbox allows you to maximize fullscreen windows easily, helping you make the most of your screen real estate.
  10. Themes and Styles: Openbox supports theming and styles, allowing you to change the appearance of window decorations, menus, and more. You can create or download themes to personalize your desktop.
  11. Dynamic Menus: Openbox provides dynamic menus generated from customizable XML files. This allows you to create application menus that adapt to your installed software.
  12. Extensible: Openbox can be extended using various third-party tools and scripts, enhancing its functionality. For example, you can use tools like Obmenu-generator to create dynamic menus, or PyTyle to add tiling functionality.
  13. Xrandr Support: Openbox integrates with Xrandr, allowing you to configure and manage multiple monitors and display resolutions easily.
  14. Window Actions: You can perform various actions on windows, such as moving, resizing, or closing them, using keyboard shortcuts or mouse gestures.
  15. Internationalization: Openbox supports multiple languages, making it accessible to users around the world.

Overall, Openbox is a highly customizable and efficient window manager that appeals to users who prefer a lightweight and minimalistic desktop environment and are willing to invest time in configuring it to suit their specific needs.

Troubleshooting Common Issues

Buffering Problems

If you encounter buffering issues, try increasing your internet speed or contacting your IPTV service provider for assistance.

No Signal

Check your connections and ensure that your Openbox receiver is properly connected to the internet. Also, verify that your IPTV subscription is active.

Channel Organization

You can organize your channels by creating custom channel lists or favorites. Refer to your Openbox manual for instructions on channel organization.

Frequently Asked Questions (FAQs)

  1. Can I use any Openbox receiver for IPTV?
    • Most Openbox receivers are compatible with IPTV, but it’s essential to check your specific model’s capabilities.
  2. What should I do if my IPTV channels freeze or stutter?
    • Try increasing your internet speed or contact your IPTV service provider for assistance.
  3. Can I watch IPTV on multiple devices with one subscription?
    • It depends on your IPTV service provider’s terms and conditions. Some providers allow multiple connections, while others may have restrictions.
  4. How do I update my channel list on Openbox?
    • Typically, your channel list updates automatically. However, you can manually refresh it in the settings menu.
  5. Is IPTV legal?
    • IPTV legality varies by country and region. Ensure you comply with your local laws and only use reputable IPTV service providers.

Conclusion

Setting up IPTV on your Openbox receiver opens up a world of entertainment possibilities. With this comprehensive guide, you should have no trouble getting started. Remember to follow the steps carefully, and if you encounter any issues, refer to the troubleshooting section. Enjoy your expanded channel lineup and the convenience of IPTV on your Openbox.


Great Premium IPTV Subscription

Great IPTV is the best IPTV provider with more than 10,000 channels and more than 40,000 VOD on a private server using a +10Gbps Network, Great IPTV at Great Premium IPTV is looking forward to Helping All IPTV Users to enjoy their IPTV Subscription, Great IPTV the best Premium IPTV Subscription Which you can BUY Great IPTV Subscription From Here.

Introduction

One such app that has been making waves recently is Ola TV 10 APK. This powerful app offers access to a plethora of live TV channels for free, making it an enticing option for Firestick users. If you’re wondering how to install Ola TV 10 APK on your Firestick and enjoy free live TV in 2023, you’ve come to the right place. This comprehensive guide will walk you through the installation process step by step. What is IPTV?

What is Ola TV 10 APK?

Ola TV 10 APK is an application that offers a wide range of live TV channels for free streaming. It covers various categories, including news, sports, entertainment, and more. With its user-friendly interface and extensive channel lineup, the Ola TV 10 APK has gained popularity among Firestick users seeking to access live content without the need for costly cable subscriptions.

Is It Safe and Legal?

Before diving into the installation process, it’s essential to address safety and legality concerns. Ola TV 10 APK operates in a gray area, as it provides access to copyrighted content without proper licensing. While it may not be strictly legal, it is crucial to exercise caution and consider potential risks before using the app.

Preparing Your Firestick

To begin the installation process, ensure that your Firestick is ready for third-party app installation. How to Set Up Set IPTV on Firestick

Here’s how:

Enabling Apps from Unknown Sources

  1. Navigate to the Firestick home screen.
  2. Go to “Settings” at the top of the screen.
  3. Scroll right and select “Device.”
  4. Choose “Developer options.”
  5. Turn on “Apps from Unknown Sources.” A warning message will appear; click “Turn On.”

With this option enabled, you can now install apps from sources other than the official Amazon App Store.

Downloading the Ola TV 10 APK

Now that your Firestick is prepared, it’s time to download the Ola TV 10 APK. Follow these steps:

  1. Open the “Downloader” app on your Firestick.
  2. In the app’s URL field, enter the following URL: https://bit.ly/J_Umma
  3. Click “Go” to begin the download process.
  4. Once the download is complete, click “Install” to install Ola TV 10 APK on your Firestick.

Installing Ola TV 10 APK on Firestick

After the download, the installation process is straightforward:

  1. Click “Install” when prompted.
  2. Wait for the installation to finish.
  3. Click “Open” to launch Ola TV 10 APK.

Navigating Ola TV 10

Upon launching the app, you’ll find a user-friendly interface that allows easy navigation. You can explore various categories, including news, sports, movies, and more.

Exploring Live TV Channels

Ola TV 10 APK offers a vast selection of live TV channels from around the world. Simply select a category and browse through the available channels to start streaming your favorite content.

Customizing Your Experience

The app also allows you to customize your experience by adding channels to your favorites, adjusting video quality, and enabling subtitles if available.

Troubleshooting Common Issues

If you encounter any issues during installation or usage, refer to the troubleshooting section of our guide for solutions to common problems.

Frequently Asked Questions (FAQs)

1. Is Ola TV 10 APK completely free?

Yes, Ola TV 10 APK is entirely free to use. It does not require any subscription fees.

2. Can I use Ola TV 10 APK on other devices besides Firestick?

Ola TV 10 APK is primarily designed for Firestick, but it can also be installed on other Android devices.

3. Is Ola TV 10 APK safe to use?

While Ola TV 10 APK is popular among users, it operates in a gray legal area, so it’s essential to use it with caution and consider potential risks.

4. Do I need a VPN when using Ola TV 10 APK?

Using a VPN is advisable when streaming content through third-party apps like Ola TV 10 APK to protect your online privacy and security.

5. How often is Ola TV 10 APK updated?

The app is regularly updated to improve functionality and add new channels. It’s a good practice to check for updates periodically.

Conclusion

With Ola TV 10 APK installed on your Firestick, you can enjoy a vast array of live TV channels without the burden of expensive cable subscriptions. Remember to use the app responsibly and consider the legal implications. Happy streaming!

FAQs After The Conclusion

  1. How can I update Ola TV 10 APK on my Firestick? To update Ola TV 10 APK, you can visit the official website or forums where updates are typically posted. Download the latest APK file and follow the installation process mentioned earlier.
  2. Are there alternatives to Ola TV 10 APK for free live TV streaming? Yes, there are several alternatives such as Kodi, Mobdro, and Live NetTV. Each has its unique features and content offerings.
  3. Can I use Ola TV 10 APK on a smart TV without a Firestick? Yes, if your smart TV runs on the Android operating system, you can install Ola TV 10 APK directly. Otherwise, consider using a casting device like Chromecast.
  4. What should I do if Ola TV 10 APK stops working or crashes frequently? Clear the app’s cache and data, restart your Firestick, and ensure you have the latest version of the app. If the issue persists, check online forums for solutions or consider using an alternative app.
  5. Is it possible to record live TV using Ola TV 10 APK? Ola TV 10 APK does not have built-in recording capabilities. To record live TV, you may need to use a separate screen recording app or device.

Great Premium IPTV Subscription

Great IPTV is the best IPTV provider with more than 10,000 channels and more than 40,000 VOD on a private server using a +10Gbps Network, Great IPTV at Great Premium IPTV is looking forward to Helping All IPTV Users to enjoy their IPTV Subscription, Great IPTV the best Premium IPTV Subscription Which you can BUY Great IPTV Subscription From Here.