In today’s digital age, IPTV (Internet Protocol Television) has become increasingly popular as a convenient way to access and enjoy a wide range of television content. Whether you want to record your favorite shows, sports events, or movies on your iOS device, this article will guide you through recording IPTV in iOS via screen capture. By the end of this article, you’ll have the knowledge and tools to capture and save your favorite IPTV content for offline viewing. What is IPTV?
![]()
Introduction
IPTV has revolutionized the way we consume television content. However, there are times when you may want to record your favorite shows, sports events, or movies to watch later. This article will walk you through recording IPTV on your iOS device using screen capture methods.
Understanding IPTV
Before we delve into the recording process, let’s briefly understand what IPTV is. IPTV is a technology that delivers television content over the internet, allowing users to stream live TV, on-demand videos, and more. It’s a flexible and convenient way to access a vast array of content.
Why Record IPTV in iOS?
Recording IPTV content in iOS can be beneficial for several reasons. You can save content for offline viewing, create a personal library of your favorite shows, or capture memorable moments from live broadcasts. Whether it’s for convenience or archiving purposes, recording IPTV can enhance your entertainment experience.
Preparation and Tools
Before you start recording IPTV on your iOS device, you’ll need the following:
1. iOS Device
Ensure you have an iOS device, such as an iPhone or iPad, with the latest operating system installed. GSE IPTV for IOS and Apple TV
2. IPTV App
Download and install a reputable IPTV app from the App Store. Make sure it’s compatible with your iOS version. How to setup Plex on Apple TV?
3. Screen Recording Software
Your iOS device comes with built-in screen recording functionality. Familiarize yourself with this feature, as it will be essential for capturing IPTV content.
Record your MacBook’s screen
To get started recording your Mac’s screen, open QuickTime Player. Go to File > New Screen Recording. The Screen Recording window will resemble.
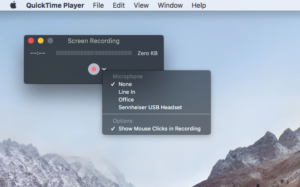
Click the downwards-facing arrow next to the record button and you’ll notice configuration options. To add a voiceover, select a Microphone source. If you’d like the recorded video to show mouse clicks (which are displayed as a thick black circle around the pointer), turn that option on.
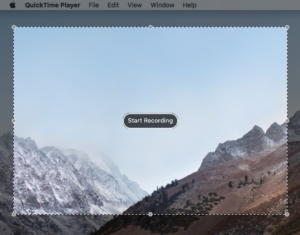
Click the big record button. You can now click again to start recording or drag an area to record only that part of the screen. In the latter case, click Start Recording when happy with your selection.
Once you’re done recording, click the record button in the menu bar. Your movie will open inside QuickTime Player.
Save, trim, and export your video
After viewing your movie, you may need to edit it. Before doing so, go to File > Save and save a copy of the whole recording. Then, go to Edit > Trim (Command+T). Use the yellow drag handles to set new start and end points for your video. (For full-screen video recordings, you’ll especially want to remove the bit at the end where your cursor moves to the menu bar to stop the recording.)

If positive you’ll never need the cut footage, go to File > Save (Command+S) to overwrite the original file; alternatively, multiply your clip (File > Duplicate) and save the copy.
Long movies and/or those from a high-resolution screen may be quite big. You can optionally use Export As… to save versions of your movie in formats with a lower resolution (useful if emailing them). Notwithstanding, if you’re uploading to YouTube, don’t decrease the quality of your footage beforehand, because the site will do that for you. The same goes for sharing them through iCloud.
Record your Apple TV’s screen
Recording video from an Apple TV isn’t completely easy. Your Apple TV must still be outputting content via HDMI – both to television or by managing a headless display emulator.
To record an Apple TV, you’ll additionally be required to connect it to your Mac. The fourth-generation model can be attached using a USB-C cable. The Apple TV 4K lacks a USB-C port, and so you’ll need to match your Apple TV and Mac, which must be on the related Wi-Fi network.
How you go about this depends on what version of macOS you’re running. On macOS Sierra, use Xcode (free on the Mac App Store) to match the devices. Go to Window >Devices and Simulators. On the Apple TV 4K, open the Settings app and go to Remotes and Devices > Remote App and Devices. In Xcode, select your Apple TV and enter the pin that appears on the Apple TV. The devices should now be joined.
In QuickTime Player, go to File > New Movie Recording. Click the downwards-facing arrow next to the record button select your Apple TV from the Camera and Microphone options, and then choose a quality setting (High or Maximum).
If you’re using macOS Sierra, your paired Apple TV should be mirrored within QuickTime Player at this point, and you can start recording. On macOS High Sierra, you’ll when choosing your Apple TV from the Camera options be asked to enter a code from the Apple TV on your Mac, and then acknowledge the screen recording on the Apple TV. (Also: a red box appears around the Apple TV’s screen when recording’s happening, but this does not become part of your movie.)
Record an iPhone or iPad’s screen
Recording an iPhone or iPad’s screen can be done easily using the built-in screen recording feature that Apple provides on iOS. Here’s how you can do it:
As of iOS 11, an iPhone or iPad can record its own screen without additional software. In the Settings app, go to Control Center > Customize Controls. Tap the + next to Screen Recording.
When you next bring up Control Center by swiping from the bottom of the screen, you’ll see the screen recording button. Tap it and you’ll get a three-second countdown before the recording begins. When you’re done, tap the red bar at the top of the screen and then Stop, or press the button in Control Center a second time. Your video will be saved to Photos.
With an iPhone or iPad running iOS 10, connect your device via USB to your Mac. Then use the same process in QuickTime Player as when recording an Apple TV.
Note:
- You can also record audio along with the screen by long-pressing the screen recording button in the Control Center and toggling on the microphone.
- While recording, be mindful of any sensitive information on your screen, as everything will be captured.
- Some apps, like Netflix and certain banking apps, may restrict screen recording for content protection reasons.
This built-in screen recording feature should work for most purposes, but if you need more advanced features like editing, you can transfer the recording to a computer and use video editing software for further customization.
FAQs
1. Can I record IPTV content legally?
Yes, but make sure you have the necessary rights to do so. Recording copyrighted material without permission may infringe on copyright laws.
2. What if my screen recording has poor quality?
Adjust the recording settings in your Control Center to improve quality, and ensure you have sufficient storage space.
3. Is there a time limit for screen recording on iOS?
Screen recordings can typically last up to 10 minutes, but you can start a new recording if needed.
4. How much storage space do I need for recordings?
The amount of storage space required depends on the length and quality of your recordings. Make sure you have enough free space on your device.
5. Can I record live IPTV broadcasts?
Yes, you can use screen recording to capture live IPTV broadcasts for later viewing.
Conclusion
Recording IPTV content on your iOS device is a convenient way to enjoy your favorite shows on your own schedule. By following the steps outlined in this article, you can create a library of IPTV content and enhance your entertainment experience.
Great Premium IPTV Subscription
Great IPTV is the best IPTV provider with more than 10,000 channels and more than 40,000 VOD on a private server using a +10Gbps Network, Great IPTV at Great Premium IPTV is looking forward to Helping All IPTV Users to enjoy their IPTV Subscription, Great IPTV the best Premium IPTV Subscription Which you can BUY Great IPTV Subscription From Here.